Ten Week Old Chicks!
Chicks are amazing! How quickly they learn and adapt. Their personalities amuse us at Winding Pathways and their problem solving is the best! Enjoy the videos of the Hoover’s Hatchery chicks at about ten weeks.
Chicks are amazing! How quickly they learn and adapt. Their personalities amuse us at Winding Pathways and their problem solving is the best! Enjoy the videos of the Hoover’s Hatchery chicks at about ten weeks.
As soon as a few warm days arrive early each spring we search our yard at Winding Pathways for two of our favorite plants – Stinging Nettles and Dandelions.
To most people they’re weeds. To us they’re delicious yard gifts.
Stinging nettles are one of the tastiest of all wild greens. They begin growing very early each spring and are usually ready to pick about the time when gardeners plant spinach and lettuce. In Iowa that’s sometime in April. Nettles love moist soil at the edge of woods where they receive partial shade. Often they’re common on yard edges. Nettles are well named, because they can sting! Another name for the plant is “three minute itch”, because the slight stinging sensation is just temporary. There’s a way to avoid the “itch.”
We pick nettles when they are only a couple of inches tall. To avoid the sting, we either wear light gloves or carefully pluck off the top few leaves between the thumb and forefinger. About 100 leaves are plenty for dinner for the two of us. We bring the plucked nettles into the kitchen, rinse them well, and boil them for just a few minute. It’s really more like steaming them as we only put about a half inch of water in the pan. Once steamed the sting disappears. Put a dollop of butter on them with a sprinkle of vinegar and enjoy as the year’s first green crop.
We continually pick from the same nettle patch and each plant constantly creates new leaves at the growing tip. This extends the picking season for over a month, and by then our spinach is ready to harvest from the garden. For the rest of the growing season, foraging insects enjoy the nectar of the nettles.
Almost everyone knows that dandelions are edible but most people who try them quickly toss the bitter plants out and never try again. Take heart and try again! Dandelions are revered in many eastern cities where Italians live. Festivals abound across the country “…from the Redwood forests to the Gulf Stream waters….” (apologies to Woody Guthrie) and the Amana Colonies in Iowa are known for their dandelion wines. Google Dandelion Festivals to find one near you. One coming up for St. Patrick’s Day is Dandelion Days in California.
Dandelions are delicious but there’s a trick to enjoying them. The best ones are picked in very early spring when the leaves are brand new. Those poking out from under leaves are semi blanched, lack bitterness, and are delicious and packed with vitamins. As soon as dandelion leaves are full size they are too bitter to eat without special processing. Young blanched leaves can be eaten raw in salad or steamed.
Before eating any wild plant for the first time make sure you correctly identify it, using at least two sources for identification……….an expert forager and a wild food book, or a wild food book and a credible website, for example. Our all-time favorite source for wild food information is Euell Gibbons’ classic book STALKING THE WILD ASPARAGUS. If you spot one at a used book sale snap it up as quickly as you do fresh nettles. Some helpful websites include Eat the Weeds , Eat the Weeds You Tube Videos, and Food52. Episode 134 of Eat the Weeds features neighborhood foraging. At about six minutes, Green Deane, the host, shows and talks about dandelions.
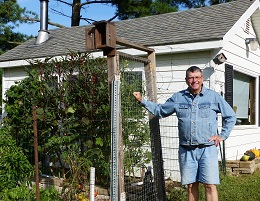
A variety of fencing keeps deer and rabbits out of the garden.
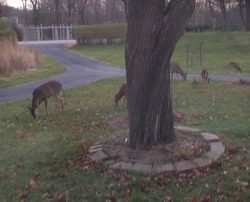
Like millions of American homeowners we at Winding Pathways have a love/hate relationship with deer. Few animals are as beautiful as a peaceful doe nursing her fawns or as majestic as a powerful buck sporting husky fall antlers. But a love of deer only goes so far. Anger mounts quickly when they devour flowers and vegetables, girdle valuable trees, or dart in front of the car on a dark night. Last year we planted a small river birch that was growing well until a buck utterly destroyed it while rubbing his antlers on it. Frustrating!
Until about 25 years ago deer mostly lived in large forests and rarely ventured into town or suburbia, but as their rural population grew they moved right into town. Most suburbs have plenty of wooded pockets where deer can hide and nutritious forage in parks, gardens, and yards. Today deer are amazingly abundant in suburbia, where they prance up and down streets and dine on valued vegetation.
DEER DAMAGE
Deer generally do two types of vegetation damage. One’s relatively easy to prevent, while the other is more challenging.
RUBS: Antlers form during warm months as a blood rich skin, called velvet, nourishes fast growing bone like antlers that are mostly calcium. By September, antlers have reached full growth. Velvet dies and dries, and bucks remove it by rubbing antlers against small trees. They prefer saplings a few inches in diameter. Rubbing often girdles and kills the tree, and deer always seem to attack the most valuable tree in the yard. It’s infuriating and costly. Although velvet is mostly gone by early October deer continue to bang and rub their antlers against trees throughout the fall.
The Cure: Fortunately there’s an easy way to prevent rubbing.
At Winding Pathways we use heavy wire in 2” X 4” mesh that we buy in 50 foot rolls. It’s relatively easy to cut an eight foot length of fencing using wire cutting pliers. Once we have the section cut we ring it around the tree and hold the ends closed with cable ties. Usually one metal fence post driven 18” into the ground will hold the wire in place. Sometimes two posts placed on opposite sides of the tree are needed. We attach the wire mesh to the post using big cable ties. The wire stays in place year round until the tree is at least 4 inches in diameter and no longer threatened by rubbing.
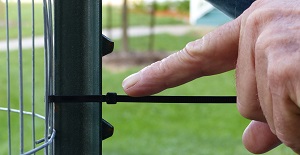
Attache zip ties firmly to a post.
What You Need to Make a Wire Ring
Putting a ring of wire around valuable young trees is almost certain to protect them from rubbing and browsing. Just be sure to do it before damage starts.
At Winding Pathways deer come into the yard. We protect young trees with fencing as seen in the back to the right.
LUNCH AND DINNER WITH BREAKFAST TOSSED IN: Deer love eating many landscape and vegetable plants. Although they have preferences, the hungrier the deer, the more likely they are to even eat plants they generally dislike. Garden books often list species of plants that deer do and don’t like to eat but beware, like humans, individual deer have food preferences. Although most deer may not like a particular plant species, others may consider it a dining delight. Deer seem to have regional tastes, so the plants they don’t like in Connecticut may be gourmet fare in Alabama or Iowa. Unfortunately, many plants that deer relish are the same ones homeowners like to plant, so protecting them is vital to success.
Damage to trees by rubbing is seasonal and normally only happens in the fall. In contrast browsing damage happens all year with deer generally eating softer vegetation during warm months and twigs during winter.
The Cure: Preventing deer from eating valued vegetation is difficult but here are some ways to either eliminate or stop it:
Fences
No doubt about it. A sturdy fence keeps deer away from plants and prevents damage. Fencing has downsides. It’s expensive, often unsightly, and it requires maintenance. A fence can ring an entire property or just an area that needs protection, such as around the vegetable garden. Generally there are two types of fence used to prevent browsing.
Repellents
A good fence will prevent deer damage by keeping hungry animals away from desirable plants. Repellents are less certain but can help reduce damage. Repellents are most helpful when temporary protection is needed or where fences won’t work and they are less expensive. They have these disadvantages:
Our good friends Dave and Sue Kramer own Kramer’s Flower Farm and produce thousands of varied colored day lilies every year. Visit their farm in mid-summer and it is a sea of blooms. People love looking at colorful flowers but deer consider them lunch. Kramer’s farm is surrounded by woods, so they have to be vigilant in keeping deer way from their crop. Dave uses a home-made spray that keep deer at bay.
Kramer’s Deer Repellent Recipe
Ingredients:
One gallon of water.
Three egg yolks
One teaspoon garlic powder.
One teaspoon cayenne pepper finely ground
Directions:
Add ingredients and shake well. Leave in the sun for a couple of days. Shake again and filter through an old nylon stocking to remove lumps or they will clog the sprayer. Put in a standard sprayer and spray plants. Treatment needs to be repeated often and after every rain.
Deer don’t like the smell or taste of rotten eggs. Who would? Anyone who would rather not make their own egg based spray can buy commercial mixes. The one we use is called Deer Stopper and is made by the Messinas Company. The label says it’s made of putrescent whole egg solids, rosemary oil, mint oil and several inert ingredients.
After buying several inexpensive sprayers that clogged we bought a Stihl brand sprayer that works well and seems less likely to clog.
Whether using a home-made or commercial repellent remember it needs to be reapplied relatively often and always after a rain.
Direct Action
Winding Pathways is near Cedar Rapids, Iowa. Several years ago the City Council approved allowing citizens to hunt deer using archery equipment. Hunters need to prove proficiency with their equipment and special rules are in place to ensure safety. Each year hunters convert several hundred suburban and urban deer into chops and steaks. Deer meat is “free ranging, local, organic” and delicious.
Each year we harvest a deer from our property. This doesn’t stop deer damage but does provide us with food, and if enough people each take a deer, their population density and, thus, damage will decline. So, if it’s legal in your area, consider converting a deer to food. Normally a state and sometimes a local permit is needed. Look for a future Winding Pathways blog on how to harvest and dress a deer.
Late this winter and early spring dozens of maple syrup festivals will shake the winter blahs. From the Midwest to the Atlantic and from the mid-South to Canada folks will be getting outside as days lengthen and temperatures warm to welcome the season’s first harvest.
Most festivals feature tree tapping and boiling demonstrations as well as delicious pancakes topped with local maple syrup.
There’s likely a festival near your home. Just type into your search engine MAPLE SYRUP FESTIVAL IN (your state or province) and details will pop up. Here are just a few:
Indian Creek Nature Center Maple Syrup Festival. Cedar Rapids, Iowa
Indiana National Maple Fest. Brown County, Indiana
Mt. Rogers Maple Syrup Festival. Virginia
Elmira Maple Syrup Festival. Elmira, Ontario, Canada
Preparing for the season’s first food harvest is a fun way to spend a few hours during winter’s deep freeze. Cornell University Cooperative and New York’s DNR have an excellent PDF “Maple Syrup Production for the Beginner.” Wikipedia features a comprehensive overview of syruping.
Trees of many maple species will flow sweet sap as soon as daytime temperatures rise into the high 30s while nights drop below the freezing point. That can happen in early February down South and six weeks later in Canada.
Syruping is fun, educational and a wonderful activity to share with children. It can be done far beyond the classic syruping regions of New England, Canada and the Lake States. We’ve been in touch with families from North Dakota to North Carolina who make maple syrup. We’ve made gallons in Iowa. All it takes is a tree or two of any maple species, the right weather and simple tools. When done properly, it doesn’t hurt the tree. Silver, sugar, black, and red maples all run sweet sap. So does the box elder, which is a true maple.
You’ll find past blogs on Winding Pathways that show how to make simple syruping equipment. Type maple syruping in the search box at the bottom of the screen or click on this link. Almost everyone already has everything needed to make small quantities of syrup, but it’s easier and a bit more sanitary to use manufactured equipment.
Many companies sell syruping equipment, but most are geared to supply large commercial operations. Tap My Trees is different. They sell easy-to-use equipment to folks wanting to tap a few backyard trees. Their website also includes helpful information on how to tap trees, collect sap, and boil it into syrup. Check it out!
Winding Pathways has had fun this spring working with neighbor children on syruping. While the season here in Iowa has ended, in more northern and Eastern areas it is still in full swing. The 2015 syruping season may last longer in the north east because of the deep snow and continued cold. Take in the excitement of a syrup festival in your region and take time to tap a tree in your backyard. Things will pop fast, so go outside and play!