by Marion Patterson | May 9, 2019 | (Sub)Urban Homesteading, Bugs, Foraging, Garden/Yard, Nature, Uncategorized
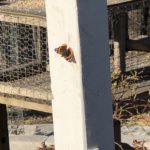
A delightful swatch of color flitted by as we sat on our back deck on one of spring’s first warm sunny days. It was a red admiral butterfly that landed on a post just a few feet from us. It appeared to be enjoying the weather as much as we were.
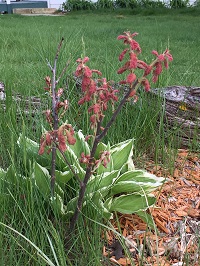
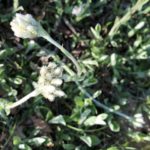
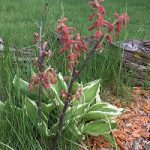
We’ve since spotted many red admirals in the yard, probably because stinging nettles thrive on the north end of our property. It’s the favored plant for red admiral caterpillars, although they’ll also live on other types of nettles. That poses somewhat of a dilemma.
What is a Red Admiral Butterfly?
These colorful butterflies depend on early blooming plants like nettles.
Red Admirals are a common butterfly across much of the temperate globe. They’re found across Europe and Asia, North Africa, Hawaii, and much of North America, especially the eastern half of our continent. The larvae feed on stinging nettles, which may not be native. So, if red admirals need stinging nettles what did they eat before the plant was introduced to North America in the early days of European exploration? It’s not even certain that stinging nettles are exotic. They may have been here all along, or early butterflies may have fed on wood nettles.
We appreciate both the insect and plant here at Winding Pathways. Red admirals add color and movement to the yard, while nettles make delicious eating. It’s the first wild green we harvest each early spring.
Can You Eat Nettles?

Carefully pluck the top three leaves off.
Stinging nettles are ready to harvest early – about the time when chard, spinach, and lettuce are planted. When the nettles are just a few inches tall we pluck off the top three or four leaves. They are called stinging nettles because the plant has tiny hairlike stingers. Walk through a patch in summer wearing shorts and nettles cause instant pain. But it’s temporary and not dangerous. Another name for the plant is the “seven-minute itch.” The sting comes from histamines.
We gather young nettles without getting stung by carefully plucking just the top leaves between our thumb and forefinger and snapping them off. About 100 young nettle tops make two servings. We bring them into the kitchen, rinse them a couple of times, and steam them for just a minute or two. The sting disappears and resulting greens are delicious. Plus they pack a nutritious array of vitamins and are high in protein.
Nettle season is short. By the time the plants are eight or ten inches tall, the new leaves are getting tough. But by then we’re harvesting chard and spinach from the garden.
We’re happy to share our yard with both red admirals and nettles. Anyone with a partly shady yard with damp soil might want to start a nettle patch. Wear a pair of gloves and dig up a few and plant them in the yard. They aren’t fussy and will provide excellent table fare and a higher likelihood that the yard will be home to the colorful butterfly.
by Winding Pathways | May 24, 2018 | (Sub)Urban Homesteading, Flowers/Grasses, Foraging, Garden/Yard, Garden/Yard, Weeds
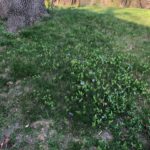
Years ago, a homeowner visited a garden store and bought plugs of a plant commercially called ground ivy, but most folks today call it Creeping Charlie.

A great ground cover that can get away from you.
In many ways this exotic plant was an ideal ground cover. It’s tough, easy to transport and plant, adaptable to a wide range of conditions, needs no special care, and it spreads like crazy. It only grows a few inches tall so was touted as a plant that, once established, needs no maintenance. And, it attracts valuable pollinators early in the season before other flowering blooms appear.
Benefits
Creeping Charlie’s benefits are also its curse. It does everything too well. Creeping Charlie doesn’t creep. Rather, it races to cover a yard with astonishing speed, often crowding out more desirable plants.
There are two ways to view Creeping Charlie.
It’s either a pernicious pest or a friend that needs little care. At Winding Pathways, we look at it both ways depending on where it’s growing. When it’s crowding wildflowers or our garden vegetables we rip it out of the ground. In places where it can’t infect a garden or native wildflowers we leave it be and know we won’t need to mow that area often.
Controlling Creeping Charlie
There are lots of ways to control Creeping Charlie. We pull it out of the ground. Roundup and other herbicides kill it, and it’s possible to smother it under black plastic sheeting. Mulch works for a while but soon the plant will thrive on even a thick layer of shredded wood mulch.
A member of the mint family and also known more romantically by an elderly Irish friend as “Gill-Over-the-Ground”, Creeping Charlie is also edible steamed, added to omelets or brewed as a tea.
Other Ground Covers
We prefer ground covers that are less aggressive than Creeping Charlie. One of our favorites is the native Pussy Toes, which grows in patches in our lawn. We planted some when we moved in eight years ago and because we don’t put herbicides on our lawn it is spreading nicely. It is hardy and thrives in dry, sandy soil in baking sun. The hairy, silvery leaves lie close the ground and in spring send up enchanting stems with little “pussy toe” flowers. The Lady Bird Wildflower Center confirms this native plant is widely spread and thrives in open meadows and woodlands and rocky areas. We’ve seen it all over the eastern half of the country and Canada. We love it! Again, it saves mowing, adds color and texture to the landscape and attracts early season pollinators.
We also use Vinca, with its periwinkle flowers, on some parts of our lawn especially areas we do not want to mow. It spreads easily, adds color and texture to the landscape and reduces maintenance.
-
-
Pollinators like ants flock to pussytoes.
-
-
An excellent ground cover.
-

-
Pretty purple violets.
Our lawn actually is a mosaic of many plants. Since we shun herbicides we have a lawn blend of grasses, violets, dandelions, pussytoes, and many other plants. They are all fascinating and help pollinators through the seasons.
by Winding Pathways | Apr 26, 2018 | (Sub)Urban Homesteading, Foraging, Travel/Columns

At the Iditarod Start
Food in Alaska is just plain fun! The Last Frontier state has one of the most ethnically diverse area codes in the country. English, Irish, Scottish, German, French, Norwegian, Swedish, Dutch, Polish, Filipino, Hawaiian, Samoan, Tongan, African Americans, Laotians, Japanese, Vietnamese, Indian, Chinese, Native American, Italian, Mexican and Russian are among the many groups of settlers. Alaska Natives with their several family identifications make up even more diversity.
And, as the spring 2018 issue of “Bake From Scratch” magazine points out, each cultural group brought its own type of food which has since fused into uniquely Alaskan fare. I sampled lots the few days I was in Alaska this winter. Some from different cultures and some from the subsistence foraging that is part of being Alaskan.
Art on a wall
My daughter and son-in-law hosted me for a fun Fur Rondy-Iditarod time in March. At a charming downtown restaurant, we enjoyed the wall art being prepped for “First Friday” when art galleries and restaurants feature new art, stay open for music and sometimes introduce new dishes. Tomato bisque and roll and grilled cheese sandwiches hit the spot on a cold and grey late winter day.
After walking off the lunch we hit Wild Scoops for their truly Alaskan sourced ice cream of “wildly” exciting flavors. From the micro-creameries to the harvested berries they boast ingredients from Alaska in generous Wild Scoops portions. We then wandered through the Alaska Museum to walk off those calories.
On the morning of the Iditarod, the first order of business for Brian and me was the stop at the Fire Island Rustic Bake Shop. This truly family affair of making traditional and specialty breads, muffins and scones using organic ingredients was a delight to see and smell. Lines out the door gave a clue to the popularity and was worth the wait to select a roll and coffee for the walk up to the Ceremonial Start. We saved a muffin for Nancy who was working at Campbell Creek Science Center where the Ceremonial Start ends at the Campbell Airstrip.
While not particularly “ethnic” the hotdogs for sale by vendors at the downtown Ceremonial Start of the Iditarod had long lines waiting with numerous sauces and spreads to tempt the taste buds.
-

-
Tasty treats!
-

-
Artisan Breads ready to buy.
-

-
New and different foods!
-

-
Coffee!
A trip to New Sagaya market was an eye-opener. So many choices from so many countries and cultures within each country. We snacked on interesting appetizers while we sipped great coffee. Poke – Hawaiian for slice or section – can be both a fish salad and an appetizer. We ate aku a raw oily tuna. Well, it was OK to try – once. Mochi is a round rice ball. Kind of soft and squishy. It had a subtle sweetness. Mike Barnes, Chief Operating Officer, accurately boasts, “NEW SAGAYA DOES WHAT NOBODY ELSE WANTS TO DO…WE GO THE EXTRA MILE.” Indeed, they seem to! Friendly, knowledgeable and the store is well-stocked with about any diverse food customers could want.

Waiting for the movie to start.
The Bear Tooth Theatre Pub is a “have to visit” place to eat and sample craft beers while watching first run, indie and foreign films. Broken Tooth Beer served there is just one of the best! And the pizzas are loaded with great locally sourced toppings on a crispy yet substantial crust. And, the popcorn…of course! Have to take it in. The background is that a few “fresh-faced college friends” concocted the idea of The Theatre Pub in the late 1990s. They gave up lucrative careers in computers and law when craft beers were coming of age and have been going strong since.
Not only did we eat out, but also, Nancy and Brian prepared wonderful meals at home. Most Alaskans forage and they are onto this one. They’ve had great adventures halibut fishing, picking berries and making jams and chutneys. Brian has plans for fall hunting and fishing expeditions. Meanwhile, they served elk and moose from previous trips, halibut tacos, Dutch Babies with their jams, and salmon from a neighbor. One friendly fact about Alaskans I learned is that if someone offers to help or offers food, say, “Yes. Thank you.” Alaskans mean it when they offer.
-

-
Moose and elk with greens and side dish.
-

-
Beautifully presented dinner.
-

-
We enjoyed wonderful home cooked meals.
Alaskans I met are genuinely friendly and use organic and local products as much as possible. Always, the dishes are infused with a truly Alaskan personality – We are Glad you are Here!
by Winding Pathways | Apr 12, 2018 | (Sub)Urban Homesteading, Chickens, Foraging, Garden/Yard, Geology/Weather
You know Steve Brown is from Texas right away. Vernon, Texas, to be exact. Home of the Red River Valley Museum, that features native sons trombonist and singer, Jack Teagarden and singer-songwriter, Roy Orbison. Brown’s drawl and easy manner draw you in. But, there is something else in his voice – maybe a hint of an Eastern clip? Perhaps a touch of wry Midwestern humor? And, what about the creative way he describes raises chickens in the north?
Technology and Tinkering
All of these are part of Dr. Stephen Brown who has lived, studied and worked in Upstate New York, Kansas, and now Alaska. “I grew up raising chickens since age eight,” he stated. “I love the soap opera of the coop,” he added. An engineer and self-professed “tinkerer” Brown is smart, innovative and ambitious. Above all, he is good with people. Pretty important qualities since he is District Agriculture and Natural Resources Cooperative Extension Service Agent for the Mat-Su/Copper River District of Alaska. He integrates his specialties of Global Positioning System (GPS) and Geographic Information Systems (GIS) with agriculture and the environment.
He applies his advanced degrees in Environmental Sciences from the University of Texas at San Antonio and the State University of New York, and his numerous publications and presentations practically for those living in the far north.
As Alaskans learn to raise poultry, till the soil, and ward off predators Brown is right with them. “I get to remote homesteads by boat, airplane and snow machine,” he said. “I may be the only extension agent in the country with reimbursement mileage for a snow machine,” he quipped.
Adapting the Coop
“Chickens can adapt to the cold when they have a safe coop,” explained Brown. After arriving in Alaska about a dozen years ago, he experienced some of the challenges of “high latitude farming.” He researched and presented keynote talks across the US and Canada. Then, he adapted methods that fit with homesteader lifestyles and pocketbooks. “You have to be practical because of the costs,” he explained. For example, temperature extremes make watering farm animals a problem. Since you don’t want to haul fresh water out every day and everything in Alaska is expensive, Brown adapted dog water bowls to stay heated in the winter for the low cost of about 15 bucks.
Brown also addressed other barriers to raising poultry in the far north. “Frostbite and ammonia build up are the two largest killers up here,” he explained. To prevent frostbite on chickens’ toes, Brown simply installed flat perches instead of round ones, so the chickens’ feathers covered their toes when they roost. Frostbite solved.
Animals also need to be safe from predators – bears and mosquitoes. So, the coop must be sturdy, have mosquito netting inside heavily wired windows, and have good ventilation. He converted an old horse stall to a secure, ventilated and warm chicken coop. He affirmed that chickens can handle the cold and only adds a heat lamp when temperatures really drop into the double-digit minus degrees.
Tom Sawyer Method
The deep litter method works well to keep the coop fresh and prevent ammonia build up. Spread a thin layer of fresh litter about once a week and toss in some treats for the chickens to scratch and keep the litter turned over. A couple of times a year he uses the “Tom Sawyer” method of cleaning up the coop. “I invite local gardeners to come over to my place twice a year and clean out the deep litter. I show them how to use it in their gardens to improve their soil for better crops,” he explained. Win-win.
Some poultry techniques he teaches in “Chicken U” classes which fill up. These include such basics as how to safely catch, hold, and butcher a chicken. Classes are booming and so is poultry husbandry. According to Brown, in the past eight years, chicken orders have skyrocketed from single thousands to well over 120,000. He gets to experience the great results of good husbandry and farming in part because he is president of the Alaska State Fair board of directors. The State Fair runs late August.
Marathon Man and Mountaineer
In his position, Brown is passionate about more than chickens. He has been on the cutting edge of promoting Rhodiola rosea as an important cash crop for Alaskans.
And, he is not all work and no play. His recreational pursuits run deeply, too – literally. He’s a marathoner and mountaineer. Since 1979 Brown has summited numerous peaks and seeks to summit on all continents. He even mused about taking a chicken to the top of Denali. “Even though I am no a spring chicken myself, I think it’d be kinda fun,” he said.
Call him up some time to chat chickens and crops. You’ll know him at the Alaska State Fair by his drawl and friendly manner that draws you in.
by Winding Pathways | Jul 20, 2017 | (Sub)Urban Homesteading, Foraging, Nature, Trees/Shrubs

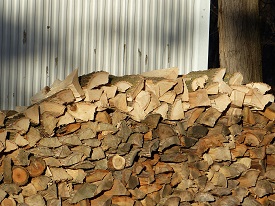
We love the cozy heat of wood burning in the woodstove.
Much of our heat at Winding Pathways comes from our two woodstoves. We love the cozy warmth given by our stoves but there’s more to it than just heat.
The wood we burn comes from trees that snatched carbon dioxide from the atmosphere in the past 100 years. Photosynthesis transformed carbon and water into wood, so we’re not contributing to global warming as much as if we burned coal, oil, or natural gas. And we get our wood free, thus helping the family budget.
Wood heat isn’t completely without cost. Each year we hire a company to clean and inspect our chimney and stove. So, we lay out some cash but far less than for conventional fuel. Wood heat also requires sweat equity to cut, stack and move firewood. At this point, it’s worth it. An added benefit is the security we feel when gazing at our six cords of stored wood. When storms shut down utilities we’ll stay warm.
Summer is an ideal time to prepare for autumn’s crisp nights.

We have a professional chimney cleaner tend our chimney.In summer’s heat, we have our chimney cleaned. Chimney’s tend to accumulate build ups of a substance called creosote and soot. This build up can catch fire and ignite the entire house. Cleaning the chimney removes deposits and makes burning safer. We clean one chimney ourselves and hire a professional from Midtown Sweeps to clean a longer one that requires going up on our high roof. Chimney cleaning companies are located across the country and Midtown Sweeps has offices in many states. For information check them out. Don’t delay. As fall approaches cleaning companies get busy, so it’s best to have the chimney cleaned in the hot months of summer.
Burning the right type of wood properly yields the most heat and leads to minimal buildup of creosote. We get our wood free, and because we know how to find and choose firewood we keep cost and labor down. When choosing what wood to gather, cut, split, and burn it’s helpful to be able to identify the species of tree that the wood comes from. Every species yields a different amount of heat. Assuming the same level of seasoning, for example, a chunk of white oak yields about double the heat of a similar sized piece of basswood. By choosing high heat yielding wood labor and space needed to store wood is reduced. An outstanding way to learn relative heat value of most species of tree go to Chimney Sweep for a detailed chart. Many books and websites help with tree identification.
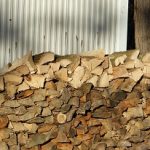
Stack wood in an airy place to cure.
To burn wood safely and hot, it needs to be cured. When we cut wood from a live, recently felled tree we split and stack it in an airy place sheltered from the rain. Place the wood up off the ground to promote air flow and reduce decay. The smaller the pieces the faster water will evaporate out of the wood. We prefer to season big chunks for 18 months but when properly stacked and split into relatively thin pieces, six months is usually adequate.
Two Scrounging tips:
- Sometimes scrounged wood is already seasoned. If the bark is off the tree and if the tree was dead and standing when it was cut down it’s likely the wood is already seasoned for burning.
- The best time for finding free firewood is during summer’s hot days when no one else is competing for firewood. The worst time to find free wood, especially seasoned wood, is during winter when competition is intense.
Winding Pathways Sources of Free Firewood

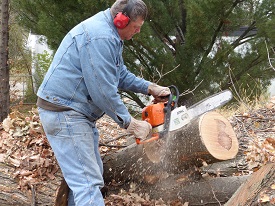
Wear protective gear when bucking up wood.
Our firewood comes from these sources that are generally available to most Americans:
YARDS. Whenever we cut or trim a tree we cut up the wood and put it in storage. Few of our neighbors burn wood and are happy to give us theirs when a tree breaks or is felled. We are also urban wood scroungers and when we find a chunk that’s fallen off a truck we collect it and add it to our woodpile. It’s surprising how much wood is available by simply being observant. After storms, home owners often drag bucked up limbs to the street edge, where they are free for the taking.
WOOD DUMP: Our city, Cedar Rapids, dumps sections of trees it has removed from streets and parks in a place they call THE WOOD DUMP. Sign a liability release form and the City welcomes anyone to remove as much wood as they’d like. It saves our town the cost of disposal and puts the wood to good use. Other cities may have similar programs. Call the town clerk or access their website for information.
SCRAP HEAP: Several nearby companies pile broken pallets and crates near their parking lot and let people scrounge wood. Mostly these are made of pine or spruce. It’s great for kindling to start fires but not for sustaining a vigorous burn. However, we sometimes find pallets made of ash, elm, or even oak. Often these include 2″x 4″ chunks, which do provide outstanding heat. We cut up pallet wood using a circular saw with a carbide blade. Use safety equipment and be careful of nails.
Get going now. Have the chimney cleaned and inspected in summer and have a shed filled with seasoned firewood before the first frosty autumn night.
Winding Pathways has no relationship, other than as a customer or user, to companies or information sources noted in this blog.
by Winding Pathways | May 21, 2017 | (Sub)Urban Homesteading, Foraging, Nature, Trees/Shrubs
This is a tale of free trees. Our friend, Marilynn Keller, learned how to plant the best tree species in her yard at no cost and with little work.
She simply didn’t mow a tiny area of lawn where she wanted a tree to grow. As if by magic, a White Oak, Sugar Maple, and Shagbark Hickory sprouted there this spring. Although the spot is too small for three trees Marilynn can simply decide which one she wants and mow the others off.
Likely a squirrel buried a nut that has sprouted.
Last fall an industrious squirrel gathered acorns and hickory nuts and buried them in her yard. The squirrel might have forgotten his hidden cache or perhaps died. Either way the unrecovered nuts sprouted.
Although squirrels often eat maple seeds, it’s most likely that Marilynn’s baby maple sprouted because a gust of wind pulled the ripe seed off a nearby tree and it helicoptered to her yard.
While Maples are usually easy to transplant, and are widely sold by nurseries, not so Hickories. Although any of the many Hickory species make outstanding shade trees, as soon as a nut sprouts it sends an enormous taproot deep into the ground. Moving a hickory is difficult and often unsuccessful. Commercial nurseries avoid them.
The same goes for white oaks, one of our favorite trees. It’s difficult to buy one to plant in the yard. Because they are slow growing and challenging to transplant, few nurseries bother with them. Fortunately, they readily sprout on their own.

In autumn Maples glow with color.
Anyone living where there are mature Hickory, Oak, or Maple trees nearby can use Marilynn’s tree planting method. Simply don’t mow a patch of lawn where a tree is desired. Odds are one will appear on its own next spring. If more sprout than the spot can support just mow the others off and put wire screening around the new tree to protect it from hungry cottontails and deer.
If a tree sprouts in the wrong place it can be easily transplanted with just one shovel of dirt. Move it before the tiny tree has grown a long taproot.