by Winding Pathways | Oct 20, 2016 | (Sub)Urban Homesteading, Garden/Yard
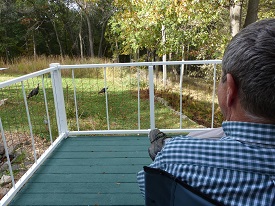
When we bought Winding Pathways six years ago we ended up with two old wooden decks and steel deck furniture.

Turkeys in yard
We love our decks and often enjoy meals there. Sometimes we just sit on our decks watching wildlife in the prairie and woodland. Unfortunately, our decks and furniture were showing their age.
They were made of pressure treated wood. Years of Iowa weather had created many cracks, and in some places the boards were uneven. So we decided to refurbish them.
Decks are challenging surfaces. Sun bakes them, while rain and snow add moisture. Changes in temperature and moisture cause wood planks to swell and shrink.

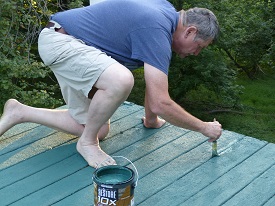
Staining big deck
Options for upgrading a deck or treating a new one include:
- Leaving the wood bare: This works. There’s no paint to peel. Maintenance includes tightening screws that work loose and occasionally washing the wood. Expect some cracking and discoloration.
- Staining: Stains penetrate wood and resist peeling. Most stains come in a variety of colors and provide some protection to the wood.
- Painting: Unlike stain, paint stays on the wood’s surface rather than penetrating. Regular exterior paint doesn’t usually last long as swelling and shrinking wood forces it loose. Special deck paint formulations are made by a variety of companies and are durable.
- Replacing with plastic wood. Fake wood sounds silly but many companies make deck material from recycled plastic. It does not absorb water so swelling and shrinkage is minimal. Color is within the plastic. Some types fade, while others don’t. Maintenance is minimal. They are very long lasting but cost is normally much higher than wood.

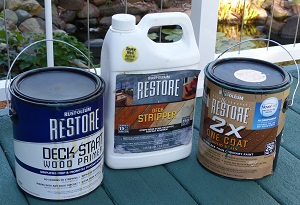
Materials for restore the deck.
To fix our deck we bought a Rustoleum product called RESTORE 10X. It is an extremely thick paint designed to fill cracks and low spots. When we applied it in the fall of 2014 it looked great. Then came a tough winter followed by a rainy spring. The new paint peeled in sheets, and we were frustrated.

Priming the deck

Painting small deck
Rustoleum guaranteed the product and replaced it with newly reformulated paint and primer. We applied it in late summer 2015. A year later it looks as good as new. The combination of the new formulation over a special primer seems to have solved peeling problems.
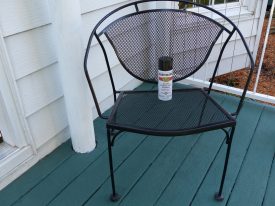
Furniture proved much easier to spiff up. The original finish had gotten dull and some rust spots were appearing. We washed and scrubbed the surfaces and applied black Rustoleum spray paint. That did the trick with minimal effort!
Now both our deck surfaces and furniture look good as new.
- Our review is an independent, unsolicited, unpaid blog.

Chair looks great with new paint.

Enjoying the deck.
by Winding Pathways | Oct 10, 2016 | (Sub)Urban Homesteading, Chickens, Garden/Yard

Winter Squash vary in color, texture, shape and size.
One of the most exciting times of our gardening year is winter squash harvest. Few plants are as interesting or useful. They’re diverse, easy to grow, colorful, easy to store, delicious, and can be used in dozens of recipes.
Winter squash were domesticated by Native Americans long before Columbus and with beans and corn provided a balanced diet. Although there are several species of squash all share similar characteristics. It’s hard to believe that common jack-o-lantern pumpkins are the same species as delicate acorn squash – but they are. Squash range in size from tiny acorns to massive 2,000 pound pumpkins. They also vary greatly in shape and color.
Squash are categorized as either summer or winter. Summer squash, such as zucchini or crookneck, are eaten during summer when the fruits are small and tender. They don’t keep long. Winter squash, in contrast, are allowed to mature until they are full grown and hard. They keep for months.
Here’s why we like winter squash at Winding Pathways:
- They’re easy to grow. Plant seeds in rich soil after the danger of frost has past, keep the weeds down until the squash plants are about a foot tall, and then just let them grow. They will out compete weeds as their vines create a solid mass of leaves.
- They’re easy to harvest. We wait until the vines die back in September and then clip off the stems with a pruning shear. We load them up in the wheelbarrow and spread them on the back deck where they continue to cure in the sunshine.
- They’re easy to store. No canning, freezing, or drying is needed. We simply bring the squash inside before the first frost and store them in a dry cool location. Several types last for months and we’re still eating them in March.
- They’re a delicious, versatile, and nutritious food. Squash is loaded with vitamins, omega 3 fatty acid, and minerals.
- They’re just plain fun. Squash even make interesting table decorations.
Winding Pathways Squash Growing Tip
Every year we plant many varieties of winter squash and pie pumpkins. We can never predict which types will grow best in a given year. In some years we get a heavy crop of one type while others barely produce a fruit. Diversity assures a good crop. Many garden stores only sell a few varieties, but we hedge our bets and order seeds of many varieties. Our favorites are Butternut, Hubbard, Silver Bell, and Sweet Potato. A wonderful source is Seed Savers Exchange. Some varieties grow to massive size, but with only two of us at Winding Pathways we stick with varieties that produce smaller squash fruits. Fortunately, plant breeders have created a downsized version of the traditional Hubbard squash and several other types.
Cooking Winter Squash
Every cookbook has winter squash recipes and Epicurious offers more online. We usually keep it simple and use our squash as a side dish with melted butter. Here are some squash cooking tips:
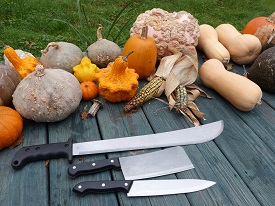
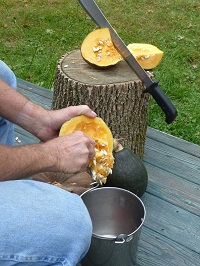
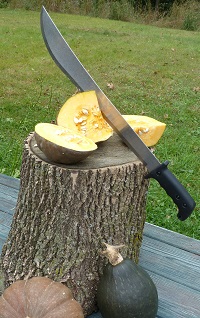
Opening a tough skinned squash: The tough thick skin covering a winter squash keeps it fresh for months but can be intimidating to cut. A heavy bladed sharp knife works but we have fun and put the squash on a chopping block outside and whack it with a machete! Works great. Our cousin, Marie Zieger, avoids cutting through tough skin by simply baking the whole squash. That softens it and makes it easy to slice it open. Another way of opening a big squash is to simply drop it on concrete to crack it and then pry it apart.
Cooking the squash: We place chunks in a pan and baking at about 350 degrees for about an hour or until the flesh is soft. Using a microwave is faster and works fine. Sometimes we put chunks in a pressure cooker for about 15 minutes. The pressure cooker method results in moister cooked squash flesh. Occasionally we’ll cut the raw squash into chunks and add them to winter stews. Extra cooked squash can be put in sealed containers and frozen.

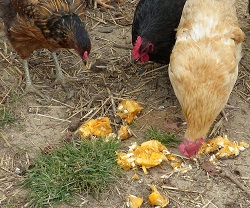
We recycle the seeds to the chickens.
Seeds and the tough skin: We scoop out the seeds and feed them to our chickens. Some people remove the cords that hold the seeds together, wash the seeds lightly, apply a seasoning, and roast them for a delicious high protein snack. Tough skins go into the compost bin.
We love winter squash. Few plants are as easy to grow and delicious.

A machete is useful in cutting squash.

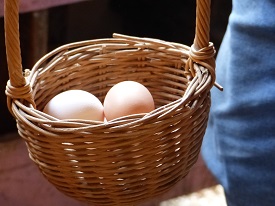
Chickens efficiently recycle squash seeds to eggs.

Eggs in basket
by Winding Pathways | Sep 12, 2016 | (Sub)Urban Homesteading, Garden/Yard, Nature, Solitude, Wonderment

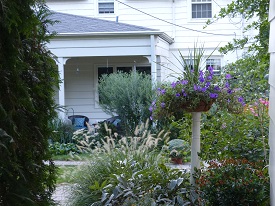
This intriguing winding path beckons visitors into the backyard.
A short winding pathway around the home of Scott and Jan Overland leads to a wondrous backyard that’s an oasis of privacy and peace within bustling Cedar Rapids, Iowa. Butterflies flitted about as a hummingbird sipped nectar from an obedient plant as we toured the yard.
“When we first moved here the landscaping was traditional and sparse, and at first we tried to maintain it that way. But then we changed course and began adding interesting plants that make our yard beautiful. It’s a fun project,” said Scott Overland, who is a professional financial adviser and member of the Cedar Rapids City Council.

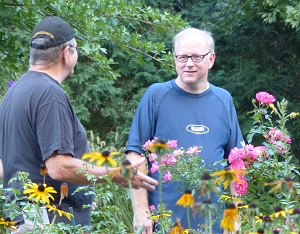
Rich and Scott share backyard delights
A special aspect of the Overland’s yard is how it has engaged them in nature and the environment. “We visit nurseries to learn about plants and sometimes add new ones. It’s a wonderful learning experience.” he said. A barred owl occasionally serenades them from a hemlock tree near the house bringing sounds of the deep woods to their neighborhood.

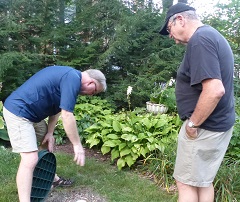
Scott shows the French drain, named for its inventor, Henry French, from Massachusetts in the mid 1800s.
There’s more. The diverse and beautiful yard absorbs storm water better than if it were traditionally landscaped. “Nowadays storms have more intensity than they once did and our yard absorbs most of the rain that falls on it. We installed a French drain to further help water enter the soil and avoid flowing into storm sewers that would add to downstream flooding,” he said.

Glimpses of comfort and color welcome visitors.
The Overlands demonstrate that a yard needn’t be big to be beautiful and ecologically healthy. They’ve created a magical space on a quarter acre lot not far from downtown.
by Winding Pathways | Aug 26, 2016 | (Sub)Urban Homesteading, Garden/Yard, Nature, Trees/Shrubs

A Guest Column by Jackie and Peter Hull
When we first moved to Virginia fifteen years ago, we had no idea that the entire state was in a drought which had been ongoing for a couple of years. In order to help water the garden we wanted to grow, we decided to construct rain barrels. We had seen the master gardeners of Bedford, VA, demonstrate how to put them together.
To begin we bought four 55-gallon barrels from Southern Flavorings for $10 apiece. The faucets and pool filters added another $15 bringing the total to $25 a barrel as opposed to $75 to $100 a piece fully equipped from a company. When we modified our barrels a few years later no longer using pool filters, we had to add the cost of screening and bungee cords which made a total of $30 a barrel.
In outfitting the barrels Peter cut circular holes in the top of each barrel and fitted them with pool filters to catch debris and give an access to help clean out the barrels in the fall. About five inches from the bottom of the barrels he cut holes just large enough to insert the faucets and rings. To help seal this entrance he used caulking compound. He modified the down spout of the rain gutter to arc over the pool filter to catch the rain. The remaining barrels sat adjacent to the first barrel and each was attached to the other with a short piece of PVC pipe that was inserted from one barrel to the next so the water would flow filling each barrel. The last barrel had an overflow spout at the top pointing to the ground so once it was filled the rain water could dribble to the ground.
As we added more barrels, Peter changed from cutting holes in the top of the barrels to cutting the entire top off and covering with plastic screen and using a bungee cord. Fortunately, the top of each barrel has a lip so the bungee cord fits snugly around the barrel holding the screen securely in place. His thinking was this would make cleaning the barrels much easier. It is. To keep mosquito larvae to a minimum, we put a mosquito donut into each barrel. The screening also protects the birds which was initially my concern when he decided to cut the tops entirely off.
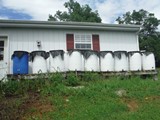
All the barrels sit on benches that we constructed so that the water is gravity fed to the garden through a number of hoses. Over the past several years we’ve added more barrels for a total of eleven rain barrels containing 55 gallons each for a total of 550 gallons of water collected from the metal roofed house and garage. This year we’ve emptied them twice over the growing season as we’ve had alternating rain and warm sunshine.
Winding Pathways Notes: Some people may prefer to buy rain barrels ready to install. Most large home improvement stores sell barrels as do many nature centers. Also, be aware that in some arid areas harvesting rain water is in dispute or illegal unless a person owns the water rights. These laws are changing as times and uses change.
by Winding Pathways | Jul 26, 2016 | (Sub)Urban Homesteading, Flowers/Grasses, Garden/Yard, Nature, Reflections/Profiles, Wonderment
Periodically readers send lovely essays and observations of their Wondrous Yards. Below is a poetic piece by Katrina Garner.
“One of the benefits of creating and maintaining burn barriers around prairie areas is that the resulting “pathways” provide the perfect opportunity to observe the prairies from all sides. Every morning I head out with our Lab Schatzie for our long daily walk around the property, letting Schatzie choose our route. Sometimes she startles a deer, and sometimes a turkey blasts out of the grasses right in front of us. Schatzie holds on to the hope that one day she’ll actually catch one of the hundreds of rabbits who manage to stay just out of her reach. Always there’s a chorus of bird songs, blending together like a pastoral symphony, to remind me to focus on nature’s sounds.

Capturing the essence of prairie blooms.
“I have my phone handy in case I see the perfect view for a future landscape painting. One day this past week we were ending the walk along the path between our first prairie planting and the pollinator strip next to it. The house was above us beyond the prairie. Our farm is named “Himmelhof,” a phrase coined by a friend of ours as an approximate Austrian translation for “House in the Heavens.” Seen from many points on the property, the house does seem to “float” above the prairie, and I’m particularly fond of those views of the house. At this point in our walk, the coneflowers and Black-eyed Susans were plentiful and at their peak, so I took out my phone and framed my photo to capture the “floating house” with colorful flowers in the foreground.
“A few days later, going through the recent photos on a larger computer screen, I was startled to see what looked like a ballerina with her arms raised to the heavens and her face turned towards the sun. If I wished to be pragmatic, I would acknowledge the fact that “she” was a cup-plant (Silphium perfoliatum) just masquerading as a fairy ballerina. However, the romantic in me chooses to see my prairie ballerina fairy as a joyful, whimsical reminder that I should always keep my mind and heart open to the beauty of the nature around me.
Katrina Garner, July, 2016″
Keep sharing about your lovely spaces, folks! Thanks, Katrina.
by Winding Pathways | Feb 28, 2016 | (Sub)Urban Homesteading, Garden/Yard, Nature
By Jacqueline Hull, contributor
Last fall, approaching my three-quarters of a century mark in age, I decided in my gardening life to experiment on a different level with growing vegetables. Winter was quickly on its way with its sharp spears of cold. Some seedlings, specifically beets, carrots and lettuce, would meet their untimely demise if I didn’t intervene.
So I rummaged through my assortment of planters finding an elongated one with a couple of colorful pots. I was in business! So out to the garden I traipsed with trowel in hand and a box to rescue a number of seedlings.
After retrieving the seedlings, I potted and set them in a south window where they have thrived. I even arranged some beet, carrot and lettuce seedlings as if for a floral arrangement – really pretty with various colors and types of leaves. Since then I’ve had many beet leaves in salads or mixed with steamed chard. The carrots are beautiful with their feathery spears. The lettuce keeps flourishing. One beet growing in a red pot became my centerpiece on the kitchen table over the holidays. It is gorgeous with cranberry red veins coursing through the deep green leaves.
Mission accomplished. I’ve had fun. Enjoyed great winter eats and spring is on the horizon!
Editor’s note: Following are some links to indoor winter gardening to keep for planning next fall. Washington Post. I particularly like the last sentences of this article. Vegetable Gardening Online features a vegetable tree, herbs and counter top gardens.