“Oh, the poor baby bunnies, they have no mom. What do I do?”
We get these type comments all the time at Winding Pathways. The short answer is: Do Nothing!
The babies are ready to “branch out!”
This summer millions of Americans will discover baby birds, fawns, bunnies, and a host of other seemingly helpless newborn animals in their yards and face the dilemma of “What do I do?”. Usually the baby is all alone with no mother in sight. It’s easy to assume the poor baby’s mother suffered a tragic fate and that the baby is doomed to an early death unless people “help” it.
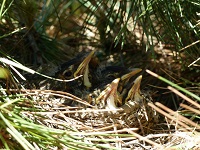
We’ve often found baby bunnies and birds at Winding Pathways and we know the best way to help it is to leave them alone. A cottontail nest we found last spring is a good example.
Female rabbits sometimes make a shallow nest in lawns. They leave the nest along and only return to nurse the young.
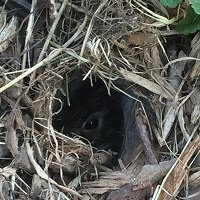
Cottontail mothers bear their young in a small hole they dig in the ground, frequently at the edge of a lawn or near a shrub. Mom knows that predators ranging from house cats to owls would love to dine on her babies, so she’s developed a sensible strategy to protect them. She stays away except for twice-a-day feedings.
If you see a cottontail sitting quietly on a spring or summer lawn there are good odds she’s above her nestlings and they’re enjoying breakfast or dinner of her rich milk. Stay away and keep your pets inside so she can complete her job. Other than at feeding time she stays away so predators don’t spot her and find the nest.
There’s a common misconception that if a human touches a baby fawn or bird it will be rejected by its mother. Not true! Maternal instinct is stronger than fear of people and many videos have shown fawns touched by people quickly reunited with their mothers. Birds have little or no sense of smell so can’t detect human scent. Still it’s not a good idea to touch a baby. The baby is likely a fledgling and learning to fly.
Many baby birds go through a growth phase we call “branchers”. Babies quickly outgrow space in the nest. When it’s too crowded they hop out and sit on a nearby branch, or a front porch, or a driveway. With the parent not visible it’s easy to assume the baby is orphaned or abandoned, but that’s hardly ever the case. It’s normal for parent birds to feed their young after they’ve left the nest, so mom and dad are probably out foraging and will return soon. The babies need energy and may be resting and waiting for a snack, so, again, keep pets and kids inside and stay away. Occasionally, placing the baby on a low branch may be appropriate in areas where there are lots of activity and the baby would be at risk of getting stepped on. Otherwise, leave the babies alone.
The best way to help wildlife babies is to stay away and quietly enjoy watching them from a distance. It’s likely you’ll soon see the parent or parents caring for its young.
Nature is not all sunshine and roses, cute baby animals and gentle breezes. Sometimes nature is rough, sometimes vicious, sometimes other creatures simply clean up carcasses of fallen animals. This spring the Heartland has had its share of hail, winds and heat. The front yard maples and Phoenix Harmony Labyrinth’s budding Bur Oak survived by bending with the winds. With the variable weather comes casualties. The last video graphically shows the scavengers cleaning up a fawn carcass that showed up on the back lawn after a night of cold, wind, and heavy rain. It’s sad but we have to remember than Mother Nature’s clean up crew will benefit from the loss. And, life goes on.
We never spray our lawn at Winding Pathways. Occasionally, that yields an exciting discovery like what happened in early May.
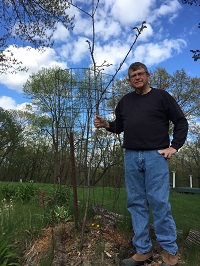
Rich shows the tiny oak seeding.
We wanted to plant a tree, preferably an oak, on the south side of our garage. But, we got busy and never found time to buy or plant one. One morning Rich, while walking across the lawn to fetch the morning newspaper, spotted a baby white oak tree that sprouted exactly where we wanted to plant one. It was serendipity.
Seed Banks”
Plant ecologists talk about the “seed bank.” In land that hasn’t been greatly disturbed by plowing, spraying or compacting of soil, seeds of desirable native plants often remain dormant in the soil for years or decades. Then, when conditions are right they’ll sprout like magic. Other desirable plants spread their seed through the wind or enlist the help of a hungry squirrel to carry and bury a nut or acorn. That’s probably how our new oak got planted.
Before mowing walk across your unsprayed lawn. You may discover a plant you want that is starting to grow. Just mow around it to let it thrive. Mark it with a stake or fence it off from rabbits and deer. If the plant is not quite in the right place, remember that tiny plants are usually easy to move with just a shovel full of dirt.
We protect volunteer trees that grow where we want them.
About seven years ago we found another baby oak in our lawn. We protected it from mowing and ran a screen around it to keep hungry deer away. It’s now about seven feet tall and growing rapidly.
That black oak didn’t cost a penny and will grace our yard long after we’re gone.
Another way to go about natural or plant and wildlife friendly yards is to deliberately plant certain forbs and grasses to attract a variety of beneficial insects and interesting birds and other wildlife.
A Kansas Couple Creatively Walk The Path
by Emily and Zach Hemmerling, guest bloggers
Anyone who has ever spent hours picking green beans knows it’s a thankless job. Aching backs, mosquito bites, and soaked sweatbands, all for a few pounds of produce that is consumed almost embarrassingly fast. Last spring, I made a resolution. If I was going to toil under the summer sun in that special brand of syrupy humidity unique to south-central Kansas, then I was going to make it look good.
String Bean Labyrinth
I decided I wanted a green bean labyrinth. My indulgent husband got quite a kick out of the idea, and planted the seeds in the sketched-out shape I left for him on the kitchen counter one morning. It’s a simple labyrinth, just a few turns, and the lines are three plants thick. We planted three different varieties: Jade, Royalty Purple Pod, and Dragon’s Tongue.
Connecting
Two great flushes of beans gave us about twelve pounds before a sudden heat wave crumpled all but the inner circle. It was still a job to “go pickin’,” but the labyrinth made it easier. And, it was always nice to suddenly find myself in the middle, and even nicer to see I’d already filled my basket without realizing it. Sometimes when my husband got home from his landscaping work we would walk the labyrinth. We’d talk about our days or plan a camping trip, or dream about what the orchard will look like in a few years. Those few minutes to reconnect before moving on to our respective evening chores would keep us going. Then the pig-weed moved in, and by that time the grapes were turning, leaving the labyrinth to slowly dissolve back into the ground. The field where the green bean labyrinth was is already planted to red clover and will be fallowed next year. Since the next plot in rotation is a bit too narrow to hold a proper labyrinth, it might be a few years before the next vegetable labyrinth takes shape. It’s worth the wait.
Editor note: Below is a You Tube video about drawing three and five circuit labyrinths. Lars Howlett is a skilled builder and facilitator connected with The Labyrinth Society.
When we bought Winding Pathways six years ago we ended up with two old wooden decks and steel deck furniture.
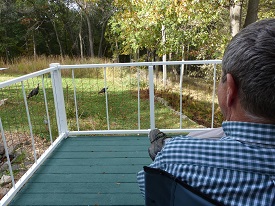
Turkeys in yard
We love our decks and often enjoy meals there. Sometimes we just sit on our decks watching wildlife in the prairie and woodland. Unfortunately, our decks and furniture were showing their age.
They were made of pressure treated wood. Years of Iowa weather had created many cracks, and in some places the boards were uneven. So we decided to refurbish them.
Decks are challenging surfaces. Sun bakes them, while rain and snow add moisture. Changes in temperature and moisture cause wood planks to swell and shrink.
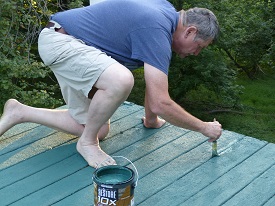
Staining big deck
Options for upgrading a deck or treating a new one include:
Leaving the wood bare: This works. There’s no paint to peel. Maintenance includes tightening screws that work loose and occasionally washing the wood. Expect some cracking and discoloration.
Staining: Stains penetrate wood and resist peeling. Most stains come in a variety of colors and provide some protection to the wood.
Painting: Unlike stain, paint stays on the wood’s surface rather than penetrating. Regular exterior paint doesn’t usually last long as swelling and shrinking wood forces it loose. Special deck paint formulations are made by a variety of companies and are durable.
Replacing with plastic wood. Fake wood sounds silly but many companies make deck material from recycled plastic. It does not absorb water so swelling and shrinkage is minimal. Color is within the plastic. Some types fade, while others don’t. Maintenance is minimal. They are very long lasting but cost is normally much higher than wood.
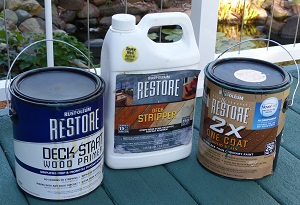
Materials for restore the deck.
To fix our deck we bought a Rustoleum product called RESTORE 10X. It is an extremely thick paint designed to fill cracks and low spots. When we applied it in the fall of 2014 it looked great. Then came a tough winter followed by a rainy spring. The new paint peeled in sheets, and we were frustrated.
Priming the deck
Painting small deck
Rustoleum guaranteed the product and replaced it with newly reformulated paint and primer. We applied it in late summer 2015. A year later it looks as good as new. The combination of the new formulation over a special primer seems to have solved peeling problems.
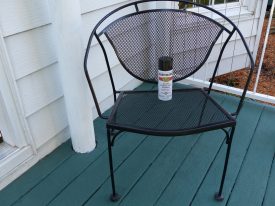
Furniture proved much easier to spiff up. The original finish had gotten dull and some rust spots were appearing. We washed and scrubbed the surfaces and applied black Rustoleum spray paint. That did the trick with minimal effort!
Now both our deck surfaces and furniture look good as new.
Our review is an independent, unsolicited, unpaid blog.
Winter Squash vary in color, texture, shape and size.
One of the most exciting times of our gardening year is winter squash harvest. Few plants are as interesting or useful. They’re diverse, easy to grow, colorful, easy to store, delicious, and can be used in dozens of recipes.
Winter squash were domesticated by Native Americans long before Columbus and with beans and corn provided a balanced diet. Although there are several species of squash all share similar characteristics. It’s hard to believe that common jack-o-lantern pumpkins are the same species as delicate acorn squash – but they are. Squash range in size from tiny acorns to massive 2,000 pound pumpkins. They also vary greatly in shape and color.
Squash are categorized as either summer or winter. Summer squash, such as zucchini or crookneck, are eaten during summer when the fruits are small and tender. They don’t keep long. Winter squash, in contrast, are allowed to mature until they are full grown and hard. They keep for months.
Here’s why we like winter squash at Winding Pathways:
They’re easy to grow. Plant seeds in rich soil after the danger of frost has past, keep the weeds down until the squash plants are about a foot tall, and then just let them grow. They will out compete weeds as their vines create a solid mass of leaves.
They’re easy to harvest. We wait until the vines die back in September and then clip off the stems with a pruning shear. We load them up in the wheelbarrow and spread them on the back deck where they continue to cure in the sunshine.
They’re easy to store. No canning, freezing, or drying is needed. We simply bring the squash inside before the first frost and store them in a dry cool location. Several types last for months and we’re still eating them in March.
They’re a delicious, versatile, and nutritious food. Squash is loaded with vitamins, omega 3 fatty acid, and minerals.
They’re just plain fun. Squash even make interesting table decorations.
Winding Pathways Squash Growing Tip
Every year we plant many varieties of winter squash and pie pumpkins. We can never predict which types will grow best in a given year. In some years we get a heavy crop of one type while others barely produce a fruit. Diversity assures a good crop. Many garden stores only sell a few varieties, but we hedge our bets and order seeds of many varieties. Our favorites are Butternut, Hubbard, Silver Bell, and Sweet Potato. A wonderful source is Seed Savers Exchange. Some varieties grow to massive size, but with only two of us at Winding Pathways we stick with varieties that produce smaller squash fruits. Fortunately, plant breeders have created a downsized version of the traditional Hubbard squash and several other types.
Cooking Winter Squash
Every cookbook has winter squash recipes and Epicurious offers more online. We usually keep it simple and use our squash as a side dish with melted butter. Here are some squash cooking tips:
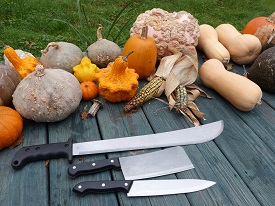
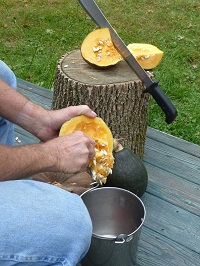
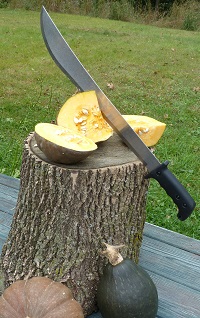
Opening a tough skinned squash: The tough thick skin covering a winter squash keeps it fresh for months but can be intimidating to cut. A heavy bladed sharp knife works but we have fun and put the squash on a chopping block outside and whack it with a machete! Works great. Our cousin, Marie Zieger, avoids cutting through tough skin by simply baking the whole squash. That softens it and makes it easy to slice it open. Another way of opening a big squash is to simply drop it on concrete to crack it and then pry it apart.
Cooking the squash: We place chunks in a pan and baking at about 350 degrees for about an hour or until the flesh is soft. Using a microwave is faster and works fine. Sometimes we put chunks in a pressure cooker for about 15 minutes. The pressure cooker method results in moister cooked squash flesh. Occasionally we’ll cut the raw squash into chunks and add them to winter stews. Extra cooked squash can be put in sealed containers and frozen.
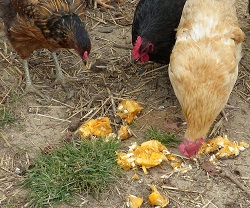
We recycle the seeds to the chickens.
Seeds and the tough skin: We scoop out the seeds and feed them to our chickens. Some people remove the cords that hold the seeds together, wash the seeds lightly, apply a seasoning, and roast them for a delicious high protein snack. Tough skins go into the compost bin.
We love winter squash. Few plants are as easy to grow and delicious.
A machete is useful in cutting squash.
Chickens efficiently recycle squash seeds to eggs.