by Winding Pathways | Dec 20, 2016 | (Sub)Urban Homesteading, Preparedness

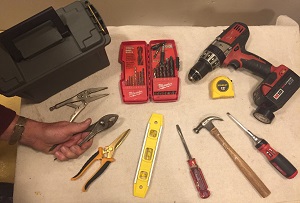
We keep an array of hand tools for small projects around the home and yard.
Our home at Winding Pathways shares needs familiar to every homeowner or renter. Things break, new items need to be assembled and pictures need to be hung. A basic set of household tools makes common tasks easy, even for people not particularly handy.
We have dozens of tools. Many are specialized, and only occasionally used but our list of frequently used tools are ones that will prove useful in every home. *Here are our favorites:
Pliers. Three types. One is a simple pair of gripping pliers used whenever something needs to be held tightly. A second is needle nosed (or long nosed) pliers used to grab and hold small items. They make fishing small items that fall into crevices easy. The third is a pair of locking pliers, often called “Vice Grips”. They make it easy to tightly grip something using only one hand, leaving the other free to do work.
Screwdrivers: A quality, old fashioned slotted screwdriver is invaluable around the house. We use ours for all sorts of things that have nothing to do with driving a screw. Prying and scraping are only two of dozens of uses. A few years ago we bought a much more useful screwdriver for inserting and removing screws. It’s actually a multi screwdriver all-in-one tool. If you have ever climbed up a ladder to remove a screw only to discover that the screw’s head is different from the screwdriver in hand, you will find this tool the best! Our new one has six different bits, all designed to fit different types of screw. Various bits are stored in the handle, making it almost certain the tool will work no matter what type screw is encountered.
Cordless Electric drill: The only power tool on our list is an amazingly versatile tool. Drilling holes is only one of many tasks it completes with ease. In addition to a case of drill bits of various diameters other bits are actually screwdriver tips or sockets. They make fast work installing or removing screws, nuts, and bolts. Many other attachments fit on a drill, including buffing and sanding wheels. We can’t imagine not having this tool. Corded drills need to be plugged in, making them much less convenient. Cordless models come with rechargeable batteries that provide much power before needing to be put back on the charger.
Ear Muffs: Loud noises lead to gradual hearing loss. We wear muffs whenever we are around loud machine noises – blenders, vacuum cleaner, lawn mower, power tools, and this time of year snow blowers!
Utility Knife: Useful for cutting cardboard boxes and most anything else. Most hold spare sharp blades in the handle.
Adjustable Wrench: These come in many sizes but we’ve found the eight inch models best for common household uses. The tool adjusts to fit nuts of various sizes.
Level: A small compact torpedo type level is amazingly useful for hanging pictures, or leveling a table or desk.
Hammer: Hammers aren’t really obsolete. We use ours to drive nails but also to tap the screwdriver when prying or scraping and for many other tasks around the house. Years ago, Marion’s mom standing at a towering 4’9” willed her tiny hammer to us that works amazing well for light projects.
Scissors: These aren’t office scissors but heavy duty shears that easily cut through heavy packaging materials, thin metal, and cardboard.
Black Tape: Sometimes called electricians tape, this isn’t strictly a tool but it’s amazingly useful in holding things together or temporarily patching a dripping pipe or exposed wire.
HOW TO ACQUIRE TOOLS
Quality hand tools are a joy to use and so durable they can last for generations. We are using wrenches, screwdrivers, and a hammer that are as functional today as they were to our grandfathers purchased them 80-some years ago. New quality hand tools can be purchased today – but beware! Many poorly made models are on the market and sold mostly in discount and big box stores. They are less expensive than good ones but aren’t as reliable and probably won’t be around to pass on to the next generation.
We buy our tools in two places – garage and estate sales that often include vintage hand tools. They may be a bit rusty, but we’ve bought quality tools for pennies. After refurbishing they are as good as new. When in the market for new tools we head for a specialty tool store. These are where professional carpenters, plumbers, electricians, and other craft people buy their tools and equipment.
Our favorite store in Cedar Rapids is Acme Tools. They only sell quality tools made by many manufacturers and we’ve never been unhappy with any tool purchased there. In recent years we’ve been purchasing Milwaukee brand tools at Acme and have found them top notch. “We only sell high quality tools, and our sales people are experts always happy to help customers select the right tool for their needs and show them how to safely use it,” said John Guidinger, General Manager.
Quality tools are more than just tools. They are well designed and crafted instruments that feel good in your hands and help making tasks a pleasant experience.
*Blogger Note: These are independent, unpaid reviews.
by Winding Pathways | Sep 30, 2016 | Preparedness
With an enormous flood surge coming down the Cedar River many homeowners were told to evacuate. Twice in eight years we’ve helped families facing evacuation only to find them mentally frozen and unable to decide what to take and what to leave.
Evacuations are difficult. No one ever wants to be forced from their home, but everyone should realize the possibility that it can happen due to a wildfire, hurricane, flood, tornado, or some other disaster.
But back to our friends who needed to decide quickly what to take with them. Neither had made any prior plans and both seemed to want to save large items, like furniture. They were mentally confused and seemed unable to decide what they should quickly grab and easily fit into their car.
That’s when we stepped in. “Take the things that can’t easily be replaced and will be useful in the next few days,” we advised. These include:
- Critical papers: like insurance documents (life, home, health), financial items, check books, credit cards, birth certificates, mortgage papers
- Many people have the most important information on their smart phone.Documents and contact information on an external hard drive. Grab them quickly and they’ll be an invaluable help during evacuation. Remember the chargers!
- Cash in small bills.
- Personal items needed for a few days and nights. Medicines. If time allows bring some clothing, flashlight, jackets, and toiletries.
- Contact information. Phone numbers and addresses of family and friends, financial advisers, physicians, insurance agent, and anyone else you may need to contact.
- Family photos and small mementos.
- Pets if possible.
The Winding Pathways website includes several blogs that help homeowners prepare disaster bins in advance of a crisis that help them survive for short periods without utilities and what to grab in an emergency. Click on “Preparedness” to see the blogs.
by Winding Pathways | Jan 18, 2016 | Geology/Weather, Nature, Preparedness

Dress in Layers, wear sturdy, insulted boots, and soak up Vitamin D with a brief “sun bath” even on cold winter days.
The woman giving our local television station’s weather report issued a dire warning. “It’s going to be below zero tomorrow with strong wind. It will feel like 30 below zero out. Stay inside”, she advised!
A gorgeous sunrise launched the next morning. It was a cold six below zero out but with only slight wind. Birds and squirrels arrived at the feeder, snatched a few seeds and flew or scampered off to enjoy breakfast in a sunny spot sheltered from the breeze.
Rarely do we have weather so bad that everyone must stay indoors. Certainly some days are more pleasant than others but at Winding Pathways we go outside, even if briefly, whether it’s frigid or broiling out -mainly to tend our animals. We mimic wildlife.
When August’s heat and humidity envelop Iowa we follow the pattern of the cottontail that lives in our yard. He and we are out in the evening and early morning. In mid-day we shun the sun and enjoy our maple’s cool shade. On blustery winter days we layer up and explore our yard, even if for just a short time. Modern clothing is amazingly effective keeping us comfortable as long as we do like our chickadees and find a sunny place out of the wind. We don’t fool around with tornadoes. If one’s approaching we heed the weather caster’s advice and stay in the basement. But, as soon as it passes we’re out in the yard.
Take temperature extremes seriously. Unusually hot or cold weather can cause serious physical problems, even death, but a prudent person who takes precautions and uses common sense will enjoy fresh air even in extreme weather.
BE CAREFUL, DRESS APPROPRIATELY, AND AVOID BEING UNDULY “SCARED” BY THE WEATHER REPORT.
“Climb the mountains and get their good tidings. Nature’s peace will flow into you as sunshine flows into trees. The winds will blow their own freshness into you, and the storms their energy, while cares will drop off like autumn leaves,” John Muir.
by Winding Pathways | Dec 29, 2015 | Preparedness

Battery operated lamps (left) are the safest to use indoors in the aftermath of storms. Be cautious if using propane lamps danger of fire and carbon monoxide poisoning.
On the evening of December 28, 2015 national news reported that thousands of people in the South are without power due to tornadoes that ripped through the region. The situation wasn’t much better in the Midwest where a howling blizzard also cut off electricity.
Many people are unprepared to ride out a week or ten days without electricity. Gathering a few emergency supplies and equipment can make enduring a storm much more comfortable. Every home should have them. While a preparedness kit may not make it in a home destroyed by tornadoes, neighbors sharing their kits could be the difference between danger and safety.
Click on the PREPAREDNESS tab on this website to learn how to manage a power outage in relative comfort.
by Winding Pathways | Aug 15, 2015 | (Sub)Urban Homesteading, Energy Efficiency, Preparedness
Nothing is as cozy as basking in wood stove’s warmth on blustery January nights, but planning efficient and safe stove operation is a year round activity. Well before the first frost we have our chimney cleaned and check the stove for safe operation.
August’s humid heat is a great time to anticipate plunging fall temperatures. Cool air is only a month away to be followed by frigid winter blasts. Now is the time to check the wood stove and clean the chimney. When few other people are thinking about winter.
Chimney fires are one of the great dangers of burning wood. These happen when creosote builds up on the inside of the chimney walls. This crusty stuff is flammable and can be ignited from a hot burning stove. Flames roaring up the chimney are terrifying and often set the house on fire.
At Winding Pathways we do these things to reduce the odds that our chimney will catch fire:
CLEAN AND CHECK: In late summer we hire a professional sweep to clean and inspect our stove and chimney. A chimney sweep will remove creosote and inspect the stove and chimney to make sure they are safe. So, we start the cool season with a whistle clean chimney.
BURN CLEAN, SEASONED WOOD: Creosote buildup is most frequently caused by burning wet or dirty wood. Wood from most pines and some other species burns with much smoke that creates creosote. Except to use a little pine for kindling we avoid burning it and other wood from coniferous trees. In general wood from trees that drop their leaves each fall, called deciduous trees, burns cleaner than pine, spruce, and fir, but it must be well seasoned.
A living trees’ wood contains an amazing amount of water needed for tree health. Wood from a recently cut live tree doesn’t burn well. It hisses as hidden water evaporates from the fire’s heat. Boiling water out of wet wood consumes energy that doesn’t end up as heat in the home and creates a cool fire that’s likely to deposit creosote in the chimney.
Wood needs to be properly seasoned. To make sure we burn dry seasoned wood we do these things:
- Split all firewood. Wood dries from the cut surface, rather than through the bark. Splitting exposes much more wood to the air than unsplit pieces, so it dries quicker and more thoroughly. Generally the smaller the piece of wood the faster it will season.
- Keep firewood off the ground and under cover. We season firewood on pallets to allow air to circulate underneath. Most of our wood is stored in a woodshed with excellent side ventilation and a solid roof to keep off rain. The rest is stored under a tarp in a breezy place.
- Give it plenty of time. Six inch diameter pieces of unsplit firewood could take up to two years to thoroughly cure, even when stacked in a dry place. If split and if stacked in a dry breezy place seasoning can take as little as four to six months. Seasoning usually means cutting wood this year for burning the next year’s winter. Not the on-coming winter.
- Pay attention to species. We’ve learned to identify species by looking at cut wood and also the tree. The amount of energy held in a piece of wood varies greatly by species. For example a chunk of hickory contains about twice the heat as the same sized piece of cottonwood or aspen. We don’t turn our noses up at woods that yield less heat. Plenty of cottonwood, silver maple, box elder and aspen have kept us warm. These species may hold lower amounts of energy than oak or hickory but their wood burns cleanly if properly seasoned. Of course, we prefer oak, hickory, locust, or sugar maple but if other species are convenient and available we cut, season and burn it.
OPERATE THE STOVE CAREFULLY: Most creosote forms when stoves are allowed to burn at cool temperatures. This normally happens when fueled with unseasoned wood or when the stove’s air intake is reduced. Choking down the air intake so a fire smolders all night is a recipe for creosote buildup. We run our stove with a brisk hot fire all day and never choke down the air intake. If our fire goes out overnight we simply light a new one the next morning.
FOR INFORMATION
To find a certified chimney sweep check Certified Chimney Professional.
A good chart of wood energy content by species is at Chimney Sweeps Online.
by Winding Pathways | May 3, 2015 | (Sub)Urban Homesteading, Energy Efficiency, Preparedness
Many homeowners harvest beans, squash, and tomatoes from their garden. Some collect delicious eggs from a small
backyard flock. Too few harvest one of life’s free necessities – Rain Water!
We set up five rain barrels at Winding Pathways a few years ago. They are so handy we don’t know why we didn’t start harvesting rain years ago. Rain barrels are relatively inexpensive and easy to set up. Water from the barrels irrigates thirsty gardens, provides drinking water for our backyard hens, and is handy for rinsing off dirty hands and tools when working outside. 
Tap water costs money. Rain water is free. It’s delivered by nature without chlorine. Too many homeowners swish rainwater down storm sewers and pay their city for tap water to irrigate.
Rain barrels yield free water but also create social and environmental benefits. They reduce pressure on municipal water systems and wells during droughts and reduce erosion and flooding caused by runoff.
A rain barrel is simply a container that collects and stores water falling on the roof. A faucet positioned low on the barrel makes filling a bucket or attaching a hose easy.
They are hardly a new technology. People have been catching and using rain for thousands of years, especially in arid areas. Relatively new are myriads of lightweight attractive barrels on the market, ranging from plain and simple to highly decorative. Most hold about 50 gallons. Do it “yourselfers” can easily make a rain barrel from a 55 gallon drum and fittings sold in any hardware store.
Most first time rain barrel users are astonished at how much water falls on the roof during even a minor shower. For example 625 gallons of rain falls on a 1000 foot roof during a one inch storm. That would fill nine or ten typical sized barrels, and most houses these days are much larger than 1000 square feet. Even during Iowa’s occasional droughts enough occasional showers fall on our roof at Winding Pathways that we always seem to have water in our five barrels.
What’s Needed to Harvest Rain?
Setting up a rain barrel outside a home that has gutters and downspouts is easy. All that’s needed is the barrel itself, a stand to elevate it, and a way to point the downspout so water goes into the top of the barrel.
The Barrel: Many websites detail how to make a rain barrel from common materials. Simply GOOGLE How to Make a Rain Barrel and several excellent well illustrated instructional sites appear. Manufactured rain barrels can be purchased in big box stores that sell yard and garden equipment. They can also be ordered from numerous places online.
The Stand: A stand gets the barrel up off the ground. Normally a hose fitting is situated near the barrel’s bottom to allow complete draining. We made stands from lumber scrounged from construction site dumpsters. They are about 18 inches tall. Placing the barrel on several cinder blocks is even simpler and requires no carpentry. Remember that a rain barrel holding 50 gallons of water weighs around 400 pounds. Stands must be stout.
The Downspout: Most downspouts extend from the gutter to the ground. Situate the stand and rain barrels below or near a downspout. Common soft aluminum or plastic spouts are easy to cut with a hacksaw. Cut it off above the height of the rain barrel so water falls directly into the top of the barrel. Or, if the barrel needs to be set to the side of the downspout buy a 90 or 45 degree angle elbow from a hardware store and attach it so water reaches the barrel. Be sure to drill a few holes in the joint and secure it with sheet metal screws.
Where to Locate the Barrel. Obviously a rain barrel needs to be located near a downspout, but most houses have several of them. Put the barrel as close as possible to the garden or wherever the water will be used.
Hooking More Than One Together. Most people start with just one rain barrel and then discover that it fills quickly in just a light rain. And, it’s easy to use all the water quickly. The solution is simple. Set up several rain barrels in a way that once the first barrel fills water flows through a small tube into the second, third, and any subsequent ones.
Rain Barrel Maintenance. Barrel maintenance is important but simple. Every five or six weeks we drain our barrels, brush the inside to dislodge the slimy material that forms on the plastic, and wash it out with tap water from a hose. Ice can crack a rain barrel, so in late fall we drain ours, turn them upside down for the winter, and put a rock on top (actually the inverted bottom) to keep the wind from blowing them away.
A Caution. Most roofs are constructed of nontoxic materials, but some may leech toxic chemicals into rainwater. Most cedar shakes have been treated with chemicals so don’t harvest water from such a roof. It’s best to wait three or four months after installing a new asphalt roof before collecting rain.
It’s exciting to bring fresh eggs into the kitchen from a flock of backyard hens, and another satisfying delight of the yard is the delicious beans, chard, and other vegetables that come from the garden. Harvesting free rain after a summer shower is another pleasure offered by a wondrous yard.

COMPANY PROFILE
RAINWATER SOLUTIONS
A few years ago Lynn and Mike Ruck, owners of Rainwater Solutions, helped the Indian Creek Nature Center in Cedar Rapids, Iowa mount a major effort to encourage residents to buy and install barrels they make. Eager residents retrieved barrels they had ordered from the back of a huge semi-truck, and soon nearly 1000 residents began harvesting water.
Many companies make and sell excellent rain barrels. We use ones made by Rainwater Solutions at Winding Pathways, and they’ve served us well. One of their models, called The Moby, holds 65 gallons while its slimmer cousin, The Ivy, holds 50.
Rain Water Solutions rain barrels are made in the USA of 100% recycled content. It is their mission to work with government agencies and non-profits to use rain barrels as an education / outreach tool for water conservation and water quality issues. They also design, consult, and install above and below ground rainwater harvesting systems. For information check their website at www.rainwatersolutions.com.