by Winding Pathways | Mar 5, 2015 | (Sub)Urban Homesteading, Foraging, Nature, Trees/Shrubs

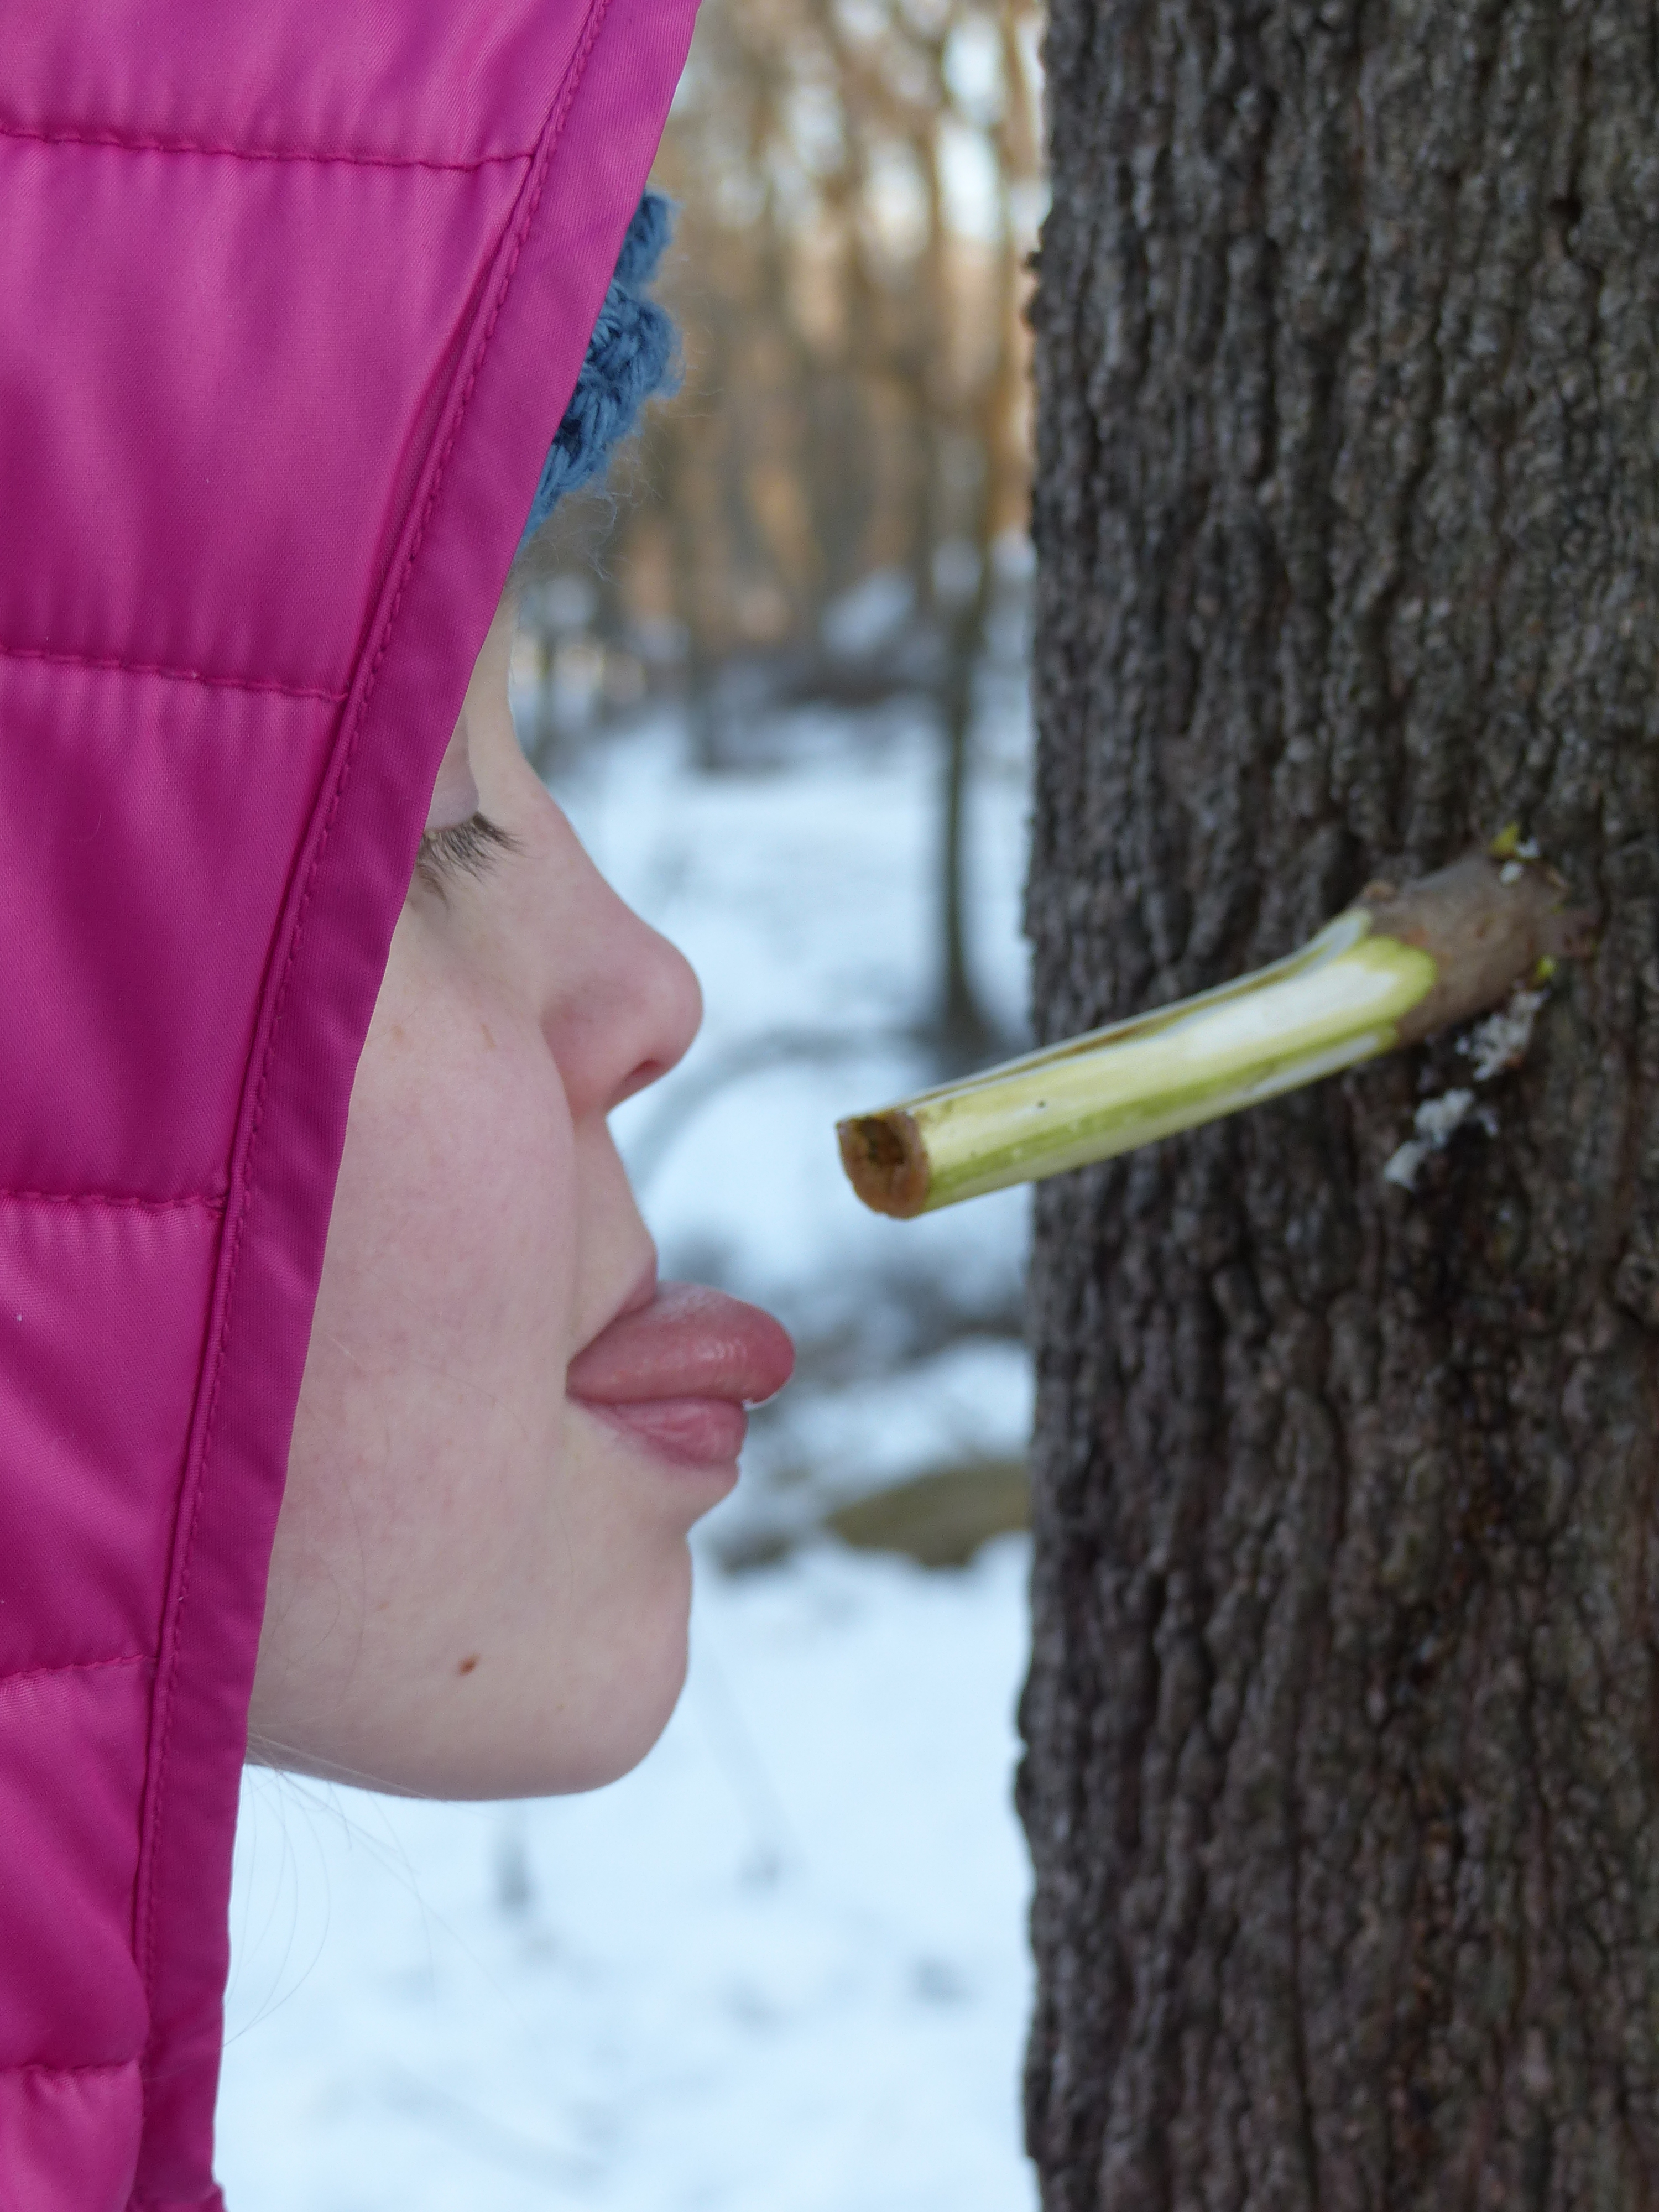
Waiting for a drop of sap.
Maple syruping is captivating. Perhaps because the process is fascinating, it’s one of the first signs of spring or it conjures up childhood memories reading books about syruping or seeing old Currier and Ives prints of Native Americans or hearty pioneers sugaring off.
Alhough it’s a historic process, tapping trees and making syrup is a fun family activity and a great way to pique childhood curiosity about history and science. Syruping is a blend of botany, weather, science, history and all topped off with delicious eating.
Native Americans invented maple syruping long ago. Before honeybees were imported from Europe and sugar became a trade item maple syrup was THE ONLY sweetener they had. Typically Native Americans made maple sugar by slicing the bark of trees in late winter, catching what sap they could in bark or wooden containers and boiling the sap in large, hollowed out wooden containers by dropping fire-heated rocks into the liquid. They used this cumbersome method because until Europeans arrived they didn’t have metal. Syruping was plenty of work.
When Europeans settled along the Atlantic coast they quickly developed a taste for maple and supplied Natives with metal buckets, pans, axes and spiles that enabled them and European settlers to make syrup efficiently. It was the main American sweetener until a cane sugar tariff was lifted in the late 1800’s. Today maple syrup is a delicious, but expensive, luxury.
Modern producers use plastic tubes to channel sap from their sugarbush (maple grove) to their sugarhouse, where it’s processed into syrup by eliminating water in ultra-modern reverse osmosis machines followed by some boiling. It’s an efficient, but not nostalgic, process.
Making syrup from a backyard tree using old methods is fascinating fun. It’s now late winter. Soon days will be above freezing and sap will flow. Syruping season is upon us. Assuming there’s a maple tree in the yard most families have many of the items they need to make a small batch of syrup. Here’s how:
What you need: It’s simple. You need a maple tree or two of any species. Sugar, black, silver, red and European maples produce sweet sap. Even common box elders, which are true maples in disguise, yield sap that makes delicious syrup. The tree needs to be at least 10” in diameter but bigger ones are better. Other needs are:
• A drill and bit to create a 7/16th or ½ inch diameter hole three inches deep into the tree.
• A homemade or purchased spout, or “spile” as it’s called in syruping country.
• A container to catch sap. Plastic milk jugs work!
• A container to collect and store sap.
• A way to boil off about 40 gallons of water to make one gallon of syrup.
Where can syrup be made: Although New England, Canada and the Lake States are traditional syruping regions it can be made anywhere maples grow and the right weather conditions occur. Syruping is possible from Alabama to North Dakota, east to the Atlantic, and even from street trees in western towns.
When are trees tapped: Maples drip sap only when nights are below freezing followed by daytime temperatures above 32 degrees. Ideal conditions are several days in a row with clear, cold frosty nights followed by sunny warm days. Traditionally syruping starts around March first in the north but can be earlier down south. The season ends when sap stops dripping as night temperatures remain above freezing. The sap flow can be as short as four or five days or as long as six weeks. It all depends on the weather.
How to tap a tree: In late winter, just before warm days are expected, gather a drill, bucket and child and tap your backyard tree. If done properly it does no harm to the tree. A young 10” diameter maple is good for just one tap, but a 30” diameter veteran can support up to three taps. Use either an electric drill or be traditional and use a carpenter’s brace and bit. Drill at a slight upward angle two to three inches into the tree. A short piece of wire can be bent into a hook to drag wood chips out of the hole. Tap in the spout, or spile, and attach the bucket or milk jug to catch sap. If the weather is perfect sap will flow as soon as the drill passes through the bark.
Spiles and collection supplies can be purchased but here’s how to make your own:
Step One: Find a patch of sumac. These common shrubs often grow along roads. Cut off a three foot section about a half inch in diameter with pruning shears. Then cut it into pieces about four inches long. Sumac has thick soft pith. Either poke it out with a piece of stiff wire or drill it out to create a tube. Taper the end that will go into the hole in the tree by whittling with a pocket knife. Gently tap your spile into the hole.
Step Two: Use the pocket knife to cut a small hole in the neck of a clean gallon milk jug just above the handle. Slip the hole over the end of the spile. If you’ve done it right the jug will stay in place and is strong enough to hold a gallon of sap without pulling out of the tree.
If the weather’s right the jug will fill in just a couple of hours. Empty the sap into a storage container. It’s best to begin boiling right away but cold sap will keep a few days. But, there are other uses for maple sap than boiling into syrup. Fill a teacup with boiling sap instead of water and add a tea bag. The delicious beverage will have a hint of maple flavor. Some people drink sap as a spring tonic.
Step Three: Now comes processing. Nothing is added to sap to create syrup but about 40 parts of water must be evaporated to make one part syrup. It can be boiled in a saucepan over the kitchen stove, but that puts lots of sticky steam into the house. Boiling is best done outdoors over a wood fire or propane burner. Large shallow pans help speed boiling. Boil for several hours. The syrup is ready to eat when:
• It is golden colored with delicious sweetness.
• It slowly dribbles off a spoon dunked in hot syrup and suspended over the pan.
• It boils at seven degrees Fahrenheit hotter than boiling water.
Serious sugarmakers use more precise ways to tell when their syrup is done but these simple tests work for a small quantity. Finished syrup has sediment at the bottom of the container that looks like fine sand. It’s mostly calcium that’s perfectly fine to eat, but it can be filtered through cheese cloth to remove it. Refrigerate your precious syrup to prevent spoilage.
Commonly asked syruping questions:
Q. Will it hurt the tree? A. Only if the tree is overtapped. Only drill one hole in a 10” diameter tree. Up to three or four taps are fine in a massive maple.
Q. Do I plug the hole in the tree at the end of the season? A. Nope. Just pull out the spile. The tree will heal itself.
Q. How much syrup will one small tree with one tap produce? A. It all depends on the weather. During a long season a small tree could yield up to a half gallon of syrup, but during a short season it might yield only a cup or two. The long term average is about one quart of syrup per tap.
Sources of Syruping Equipment and Information
Simply Google Maple Syruping and the computer’s screen will be filled with places to buy equipment and information on how to tap trees and make syrup. One of our favorite sites is Tap My Trees.
Winding Pathways urges people to go outside and have fun. Few backyard activities are as fun as making a batch of maple syrup from your own tree.
by Winding Pathways | Feb 23, 2015 | (Sub)Urban Homesteading, Foraging, Nature, Weeds
Although the northern and mid sections of the US are still bitterly cold and blanketed by inches of snow or ice, the south is beginning to warm up. That means the Greening of Springtime!
Following a long winter, a plate of steaming ultra-fresh greens from the yard is a delicious and nutritious treat.While most Americans consider stinging nettles weeds, Europeans enjoy them as an early spring food that is delicious, abundant and free for the picking.
Stinging nettles are one of the first plants to green up in early spring. They pop from the ground shortly after the snow melts and are ready to harvest about the time gardeners plant spinach, lettuce and other early cultivated greens. Winding Pathways is in Iowa, and we can count on harvesting nettles by early April, but the season starts sooner in warmer climates.
Nettles grow in all states except Hawaii and are common across much of Europe, Asia and even Northern Africa. They thrive in rich moist soil where there is partial sun. Seek them on the edge of suburban lawns and along rivers and streams. Nettles have high nutritional value and are sold in tablet or liquid form in vitamin shops. As described in the International Journal of Food Science, nettle “Results show that processed nettle can supply 90%–100% of vitamin A (including vitamin A as β-carotene) and is a good source of dietary calcium, iron, and protein.”
Stinging nettles are named for numerous tiny spines that can inject a chemical into the skin. The sensation is uncomfortable but quickly fades and is not dangerous. Some people call the plant the “seven minute itch”.
Before collecting nettles, or any other wild food, for dinner be sure to positively identify the plant. Photos of nettles can be found online and are in nearly every wild food book.
There is a trick to harvesting them. Use gloves to protect the hands and scissors to snip off the top few tender leaves. Alternately, gently put your thumb and index finger just below the top few leaves and slide them up, pinching off the top, rinse and drop a few cups of them in water. A few minutes of boiling neutralizes the sting and results in a delicious high protein vegetable. Enjoy them covered with melted butter and a dash of vinegar. Save the water that nettles have been boiled in as a stock for soup or to drink as a delicious tea.
Pinching off tender young leaves encourages the plant to produce new ones, so by harvesting nettles from the same patch about every week the collecting season is prolonged. Don’t even try eating tough mature nettle leaves or stems. Early settlers once used the fibers of these rough stems to weave into a linen-like cloth.
By early summer in the upper Midwest, the nettles have “gone by”. But, we let them grow up because many species of butterflies are attracted to the yellow-greenish flowers of the nettles. Stinging nettles are a wonderful plant that we enjoy having on our property at Winding Pathways.
by Winding Pathways | Jan 19, 2015 | (Sub)Urban Homesteading, Foraging, Preparedness
Few cold winter evening experiences are as pleasant as sitting before the woodstove soaking up the warmth of a fire. That heat is essentially solar energy captured by the tree through photosynthesis on past summer days and released by fire in the dead of winter.
There are plenty of good reasons to consider wood heat and lots of reasons to forget it. Heating with wood is a lifestyle that requires elbow grease to cut, move, split, and stack firewood. Wood needs to constantly be fed into the stove and ashes must be removed every couple of days. Although attractive and cozy, burning wood brings pieces of bark and dirt into the home. These can be downsides, but many people love to work with wood, and cutting and splitting are pleasures, not chores. Wood heat can also save heating money, especially if the fuel comes free.
We have two woodstoves at Winding Pathways. Years ago we ditched our romantic but inefficient fireplace and added a stove. They are much more efficient than fireplaces, meaning that more of the energy in a chunk of wood ends up making a room comfortable and less goes up the chimney.
Now is a great time to plan for wood heat for next winter. It takes time to buy a stove and have it installed. To lay in next winter’s wood supply nearly a year in advance is critical.
The wood of living trees contains water that must be removed before it will burn well. Cut and split firewood stacked in a dry breezy place takes six months to a year for evaporation to remove enough water to transform it into efficient fuel. Late winter is a great time to process wood for next winter. We like to have all of next winter’s wood ready by the end of this March.
Wood is solidified sunshine mixed with minerals. Not all wood is created equally. The energy contained in a chunk is directly proportional to its weight. Dry hickory, for example, is about twice as heavy as the same size hunk of cottonwood and contains double the energy. To learn the heat value of different tree species simply Google Sweep’s Library Firewood BTU Comparison Charts. This chart lists heat values of wood by both alphabet and heat (BTU) value.
Utah State University’s link includes heat value, ease of splitting, smoke emissions, how much a wood sparks and fragrance.
For example, a cord of Maple (Sugar) weighs 3740 pounds and contains 23.2 million BTUs. In contrast a cord of Cottonwood weighs 2040 pounds and contains 12.6 million BTUs of energy. This relationship shows a homeowner would need process and store about twice as much Cottonwood as Sugar Maple to yield the same amount of heat.
Wood is usually sold by the cord or 128 cubic feet. That’s a stack eight feet long, four feet high and four feet deep. Hickory, black locust, white oak and sugar maple are the heaviest common woods of eastern and central North America. Cottonwood, basswood, aspen and most pines and spruces are the lightest. Elm, cherry, silver maple, hackberry and ash fall in between. In a normal Iowa winter we burn about three cords of a blend of oak, black cherry and maple. We’ve burned our share of “poorer” woods like cottonwood and box elder because it was available and we were short of heavier species. Lighter wood generates wonderful heat. It just takes a lot more of it than if we had hickory or oak. Wood is our main, but not only, heat source. We have a natural gas furnace and installed a gas insert into the old fireplace. Both work well and keep the house warm when we go on winter trips and are not around to feed wood into the stoves.
by Winding Pathways | Aug 19, 2014 | (Sub)Urban Homesteading, Foraging, Nature, Trees/Shrubs
Every fall zillions of acorns cascade down into lawns, tumble roll off roofs, and pile up in American driveways. Raking them up is a dreaded autumn chore. Anyone who collects and disposes of acorns is tossing away delicious food.
Too many people believe these big oak nuts are toxic, perhaps because they are bitter when eaten raw. For deer, woodchucks, squirrels blue jays and a host of other wild creatures, acorns are a bonanza of nutritious food so important that a heavy acorn crop means a winter of good health while a sparse one spells starvation.
Native Americans enthusiastically collected, processed, stored and ate acorns. And they are a common food in some European cultures. A great acorn benefit in the days before refrigeration was the ability to store them indefinitely, providing food if crops failed or game was scarce. Far too many modern people don’t realize that acorns are delicious if properly prepared.
Dozens of oak species live around the world. In North America much of the eastern hardwood forest is dominated by oaks with several scattered scrubby species in the southwest and many larger ones near the Pacific coast. Even on the Great Plains and in the Rocky Mountains, where native oaks either don’t occur naturally or are uncommon, they have been planted in nearly every town and city.
Although there are many oak species all fall within one of two categories:
White Oak Group: The leaves of these oaks have rounded lobes and generally the trees produce an abundant acorn crop irregularly. Often a few falls go by with a sparse crop nuts. Then during a banner year, millions of acorns carpet a forest floor. Almost every year there will be a tree or two here and there with a heavy crop while others nearby are barren. Common white oak group species are the bur, white, and chestnut oaks. Acorns in this group have the lowest tannin content, are usually large and require the least processing. If white oaks live in your area these are the acorns to gather.
Black (or Red) Oak Group: These trees have leaves with lobes that end in points. The acorns are usually smaller than those in the white oak group but normally trees in this group produce a more reliable crop. Typical species are pin, black and red oaks.
Nearly all oaks produce acorns that can be processed for food, but because those in the white oak group produce the largest nuts with lowest tannin content, we exclusively process acorns gleaned from under white and bur oak trees. We leave the black oak group acorns for the squirrels.
Tip: When you’ve found a prolific oak just starting to drop its nuts carefully slice an acorn or two in half with a paring or pocket knife and use the point of the knife to pry the kernel out of its husk. Taste it. If it’s only modestly bitter you’ve found great acorns. If it’s very bitter seek out another tree. Although white and bur oaks usually have the sweetest acorns the tannin content varies from tree to tree, so gathering the sweetest acorns reduces later work removing this bitter substance. A white or bur oak tree producing sweet acorns may be growing next to a tree of the same species with bitter kernels. Gather the sweet ones.
HOW TO PROCESS ACORNS INTO DELICIOUS FOOD

Making delicious acorn muffins with school children.
Here is how we convert acorns into delicious food:
• Collect acorns as soon as they fall from the tree. Normally oaks begin dropping nuts in late August. September is the prime gathering month. Usually the easiest way to gather a bunch of acorns is to find a prolific white or bur oak growing over a parking lot or driveway. It’s easier sweeping up a few gallons of acorns from pavement than picking them out of the forest floor or lawn. Various insects realize that acorns are good food and quickly bore into fallen nuts. So, beat the squirrels and bugs to the acorns, pick a few gallons and bring them home. Collect only perfect acorns lacking cracks, sprouts or holes.
• Put newly collected acorns in large zip lock bags and freeze them. Freezing kills insects that may be hiding in the acorns and prevents sprouting and mold. Processing acorns is fairly tedious and time consuming. We are usually busy during acorn season and have more processing time when winter hits. So, we store our acorns in the freezer until later. Processing acorns while sitting next to a cozy January woodstove and listening to music is a pleasant winter activity. But, if you want to immediately process acorns after collecting them freezing is optional.
• Put a few gallons of fresh or frozen acorns in a large pot, like a canning pot, nearly fill it with water, and boil for 15 or 20 minutes. Boiling does two things. It softens the husks, making for easier shelling and it removes some tannin. As tannin leaches out of the nuts the water will darken. Let the boiled acorns cool down and drain them. Collect your tools. You’ll need a sharp paring knife, a cutting board, two pots and a good light source.
• Remove the kernels by cutting each acorn in half lengthwise. It should be easy to cut through the water softened husk. Use the point of the knife to pop the kernels into one bowl and the husks in the other. We compost husks They also make good mulch.
• Pour the kernels into a large pot of boiling water and slowly boil them for about ten minutes. As tannins leach out of the nuts the water will darken. While the nuts are boiling bring another pot of water to a boil. Drain the nuts from the first pot and put the kernels into the second pot of clean boiling water. If your acorns were sweet only two or three boilings will remove the tannin. When boiling water darkens only slightly you know you’ve leached out most of the tannin and there will be little bitterness left. Red or pin oak acorns could take five or six boilings to remove tannin.
• Once the tannin is gone thoroughly drain the acorns in a large colander.
• Spread the drained water-softened acorn kernels on a cookie sheet one layer deep. Dry them in an oven on low heat, stirring occasionally. The object is to dry them, not cook them. This part takes a couple of hours. When dry, the kernels will be rock hard.
Once they are completely dry, hard and cooled the acorns can either be placed in airtight jars or other storage containers or immediately ground into flour. Dried acorns will keep for years and unground kernels can be added to stews much like you might add dried beans. This is how Native Americans commonly used them.
Or
• Place the hard dry kernels in a heavy duty blender or hand or electric mill designed for grinding grain. Grind them to the texture of fine flour. Store in an airtight container. Sift the flour to separate out harder kernels. These you can store separately and add to soups where they soften and add a rich earthy flavor to the broth.
We use acorn kernels in soups and the flour in recipes such as Boston Steamed Brown Bread, cookies and muffins. Here are two of our favorite acorn recipes:
Acorn Cookies from the Kitchen of Yvonne Fellows
½ Cup cooking oil ½ tsp. almond extract
½ Cup honey ¼ Cup acorn flour
2 beaten eggs 1 ¾ Cup regular flour (if whole wheat increase the liquid)
Pre-heat oven to 375 degrees. Blend oil and honey. Beat eggs into the mix. Add almond extract then the wheat and acorn flours. Batter should be cookie dough consistency so add more flour if needed. Drop by spoons full onto greased baking sheet. Bake 15 minutes at 375 degrees.
Acorn Muffins adapted from a recipe by Yvonne Fellows
One beaten egg ¼ Cup sugar
One Cup milk 1 ¾ Cups flour
(mix of whole wheat and white or pastry)
2 TBSP vegetable oil ¼ Cup Acorn sifted flour
½ Cup molasses or honey
(I use a combination) 2 tsp baking powder
1tsp vanilla ½ baking soda
Pre-heat oven to 375 degrees. Grease muffin tins or use baking cups. Mix wet and dry ingredients in separate bowls. Blend wet and dry ingredients together until just moist. Some small lumps are OK. Fill muffin tins or baking cups 2/3 full. Bake at 375 degrees for 20 – 25 minutes. Tops of muffins should spring back when done. To prevent dryness, avoid over baking. Serve warm with honey and butter.
by Winding Pathways | Jul 14, 2014 | (Sub)Urban Homesteading, Foraging
Before the invention of agriculture nearly all people were expert hunters and gatherers. Although our world still provides plenty of wild food, free for the taking, few modern people even realize that delicious food goes unharvested in nearly all unsprayed yards.
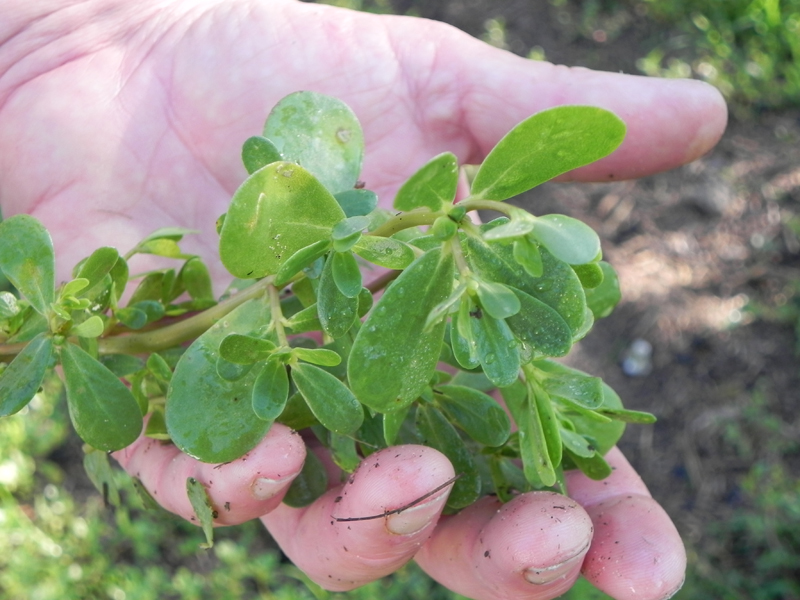
Purslane
Knowing how to identify and prepare wild foods offers opportunity for new culinary experiences, reduces the grocery bill, and gives people who know how to forage the comfort of knowing that they can find food and will eat should there be a major disruption in modern food distribution.
Winding Pathways offers on its Website common free foods seasonably available across much of North America and beyond. Some of the best edible plants live in urban areas worldwide. They are likely in your back yard if you don’t apply herbicide. Often we simply call them “weeds”.
After years of foraging, preparing, and eating dozens of wild foods we categorize them as follows:
- The Best: These are common, hardy plants that are easy to identify, harvest and prepare, and are truly delicious.
- The Marginal: These are often also common but are either difficult to harvest or prepare and/or aren’t the tastiest foods. They are great to know in an emergency but few people will eat them routinely.
- The Hunger Foods: Many common plants are edible but are normally challenging to harvest and prepare. They have little taste or are not very appealing. They are worthy to know only because eating them would be better than starving!
Winding Pathways will prioritize information on the Best category and occasionally add information on the others.
But first a word of caution. Edible wild plants share the yard or nearby park with toxic cousins. Always follow these rules before eating any new wild plant:
- Be absolutely certain you have correctly identified the plant and confirmed its edibility. Consult three independent sources before eating. For example one source could be a guidebook, such as the Peterson Guide to Edible Wild Plants. Another could be gleaned from a reliable Internet source. A third might be provided by a local foraging expert. If there is a nature center in your area staff can probably give you contact information on local experts and may even sponsor a foraging program. A good way to start is by identifying a plant in a paper book and then simply Googling it to access electronic information.
- The first time you eat something new go easy. Eat only a small amount. Some people are allergic to even the most common foods. Eating small quantities tests the body to make sure it likes it.
- Make sure any harvested wild plant comes from a place that has not been chemically sprayed. Be sure to wash all gathered foods well.
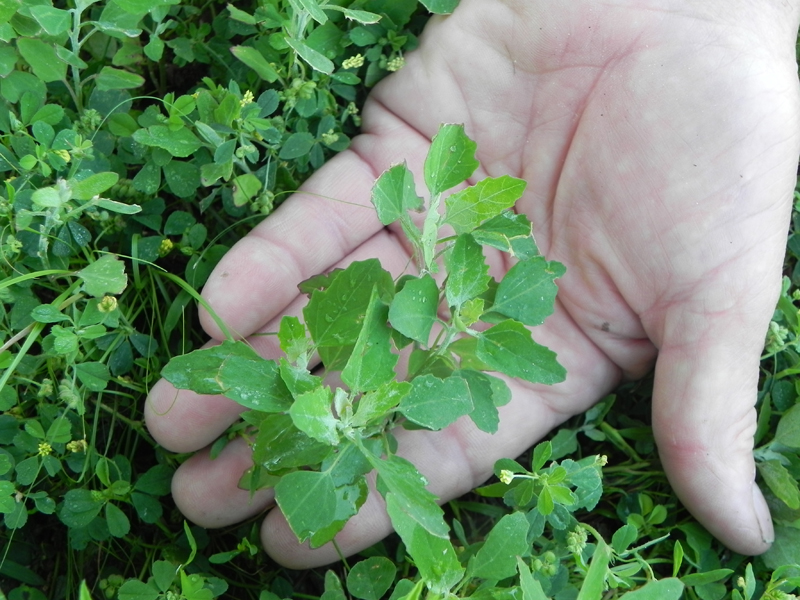
Lamb’s quarter
Winding Pathways three favorite late summer edible plants – those that are common, easy to find and prepare, and taste great – are:
- PURSLANE, an old world weed widely cultivated in India. It’s fleshy stems and leaves hug the ground and are most common in hot, poor soil. Young leaves are delicious raw in salads. Stems and leaves can be steamed or pickled.
- WILD BEET OR AMARANTH is a weed in nearly all vegetable gardens. It makes a delicious steamed vegetable when cooked like spinach. Season with butter, salt and pepper as desired.
- LAMB’S QUARTERS. Few gardens lack lamb’s quarters growing between vegetable rows. Young plants are delicious when steamed like spinach and can also be eaten raw.
Coming soon: American Indians knew a good thing when they tasted it. Acorns were an important dietary staple for them. Check back for information on harvesting and processing acorns.
by Winding Pathways | Jul 14, 2014 | (Sub)Urban Homesteading, Flowers/Grasses, Foraging, Nature
Dandelions by the millions pop up like magic in lawns, along roadsides, and just about anywhere else that sunlight reaches bare soil. They are probably the most recognized and widespread plants in the world.
A Eurasian native, dandelions reached North America as precious garden seeds brought across the ocean by our earliest immigrants. They began spreading across the continent before the Revolutionary War. For thousands of years people appreciated the dandelion’s culinary and medicinal properties. Its Latin name, Taraxacum officinale, means “official remedy for disorders.” Imagine living in Europe during the Dark Ages. Winters were cold and dark. Diets were monotonous and lacked vitamins. By late winter many people suffered severe vitamin deficiencies. They were weak, lethargic and vulnerable to fatal diseases. Then, with the first few warm days vitamin rich dandelions began growing. People ate them and vitamin deficiencies evaporated. This humble plant restored health. No wonder immigrants carried dandelion seeds across the ocean when they immigrated to the New World! How ironic that a plant that can do no harm to humans and once provided important food and medicine is today hated. If dandelions were finicky and needed special cultivation and care maybe homeowners would appreciate them! Children love bright yellow dandelion flowers and delight in blowing seeds off the puffy sphere that follows the bloom. Instead of persecuting dandelions perhaps we’d all be better off it we took a lesson from kids and just enjoyed them.
Why Dandelions Invade Lawns
In order to thrive in a lawn, dandelions need two conditions: a scrap of bare soil and sunshine. When meticulous homeowners attempt to create a monoculture lawn by mowing closely, removing lawn clippings, and aerating the soil they create perfect growing conditions for dandelions. Fluffy dandelion parachutes carry millions of dandelion seeds through the air which land nearly everywhere. If growing conditions are not good where the seed lands it won’t thrive. But if the seed has the good fortune to descend onto a closely cropped lawn, it will quickly sprout and flower to the consternation of the owner. They poison and dig out the dandies and mow the lawn to the nubbin, creating more perfect conditions for new seeds to sprout. Dandelions are probably the world’s best plant for the herbicide industry!
Reducing Dandelion Populations in an Ecological Lawn
A nonsprayed lawn is always likely to have a few dandelions, but the best to manage a lawn to reduce plant numbers is to keep the ground shady and avoid bare soil. Follow these easy steps:
- Avoid herbicides.
- Set the mower cutting depth high to allow grass to grow tall, shading the soil beneath. Mow as infrequently as possible. Leave clippings in place and never remove “thatch.”
- Avoid bare soil whenever possible.
- Eat them. Dandelions are good food!
- Let kids pick the flowers.
Eating Dandelions
Timing is the secret to enjoying this nutritious plant. Most people know dandelions can be eaten. But, the few adventurous people who have tried them often are repelled by the plant’s bitterness. Dandelions, like most other edible greens, are best when the leaves are very young. Pick them in early spring just after they’ve started growing. Bitterness sets in as the leaves mature and the weather turns hot. The best dandelions were covered by leaves in the fall and are semi-blanched when picked in spring. Mix cleaned baby dandelion leaves into salads for a peppery zing or boil as a potherb. Young leaves are best and require the least amount of work. Steam them changing the water twice. Season with butter, salt and pepper as desired. Some folks toss the greens with chopped bacon. They are tasty. Older dandelion leaves can also be eaten but must be cooked in several changes of water to remove the bitterness. Gather mature leaves. Bring a saucepan of water to a boil and put the washed leaves in. Boil for a few minutes while bringing another saucepan of water to a boil. Remove the leaves from the first pot, drain, and add them into the clean boiling water. It may take two or three water changes, but eventually the bitterness will disappear. Season as desired. Dandelion roots are also edible and can be made into a coffee-like substitute. Consult a wild foods book for details.