Cast Iron Cookery
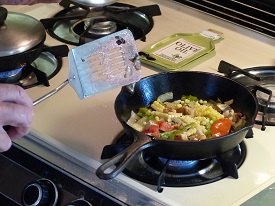
Checking the fresh vegetables as they cook in the cast iron pan.
Want to buy a product that’s inexpensive, American made, can be used every day of your life and then passed on to your children as a legacy? Cast iron cookware fills the bill.
One cool August morning Rich collected eggs from our backyard chicken flock, pulled out a cast iron skillet, and minutes later we enjoyed a delicious omelet. “That skillet once belonged to my great grandmother. It’s been handed down through generations and must be a century old yet still works great,” he said.
In this day and age when nearly all products quickly become obsolete or break, cast iron is amazingly durable. This type of cookware has been manufactured for well over 100 years and new and old ones cook amazingly well.
“I can’t think of any product as enduring as cast iron cookware. They truly last a lifetime or longer,” said Mark Kelly of Lodge Manufacturing. The company makes dozens of types of cast iron cookware in its Tennessee facility. Other American companies make small quantities of artisan cast iron skillets but they are pricey, while low quality ones are imported from China.
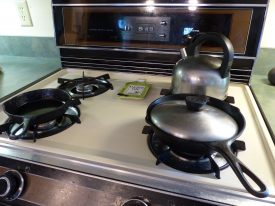
pans on the stove
We love our cast iron and regularly use several skillets of different sizes and a Dutch oven to slow cook winter stew. Several are of unknown age but obviously old. Few have any writing embedded in them so their age and who made them is unknown. We augmented our heritage pans with a few new ones made by Lodge Manufacturing. Here’s what we like about our old and new cast iron cookware:
- Lasts nearly forever.
- Easy and fun to use. Clean up is a snap.
- Heavy cast iron produces an even heat and adds a tiny bit of nutritional iron to food.
- Made in the US! Partially of recycled metal. In the unlikely event that one cracks we can recycle it.
- Food coming out of cast iron is delicious.
- Amazingly inexpensive to buy. A small skillet costs under $20.
Rich’s Sunday Morning Pancakes or Winding Pathways Waffles
2 cups whole wheat flour
½ cup buckwheat flour
½ cup milled flax or oat bran
½ cup sunflower seeds or minced pecans
¼ cup of raisins or small pieces of apple.
Two tablespoons of powdered milk
One tablespoon of baking powder
One fresh egg
Vegetable oil. (optional but needed for waffles)
Combine and mix dry ingredients and add water while stirring. Pour pancake sized pool of batter on a heated cast iron skillet. Cook on medium heat until bubbles in mix break. Flip and cook the other side. Enjoy with butter or a dollop of yogurt and warm maple syrup.
Cast iron cookware is often sold in hardware and outdoor stores and online. For information contact Lodge Manufacturing.
Our friends, Jim and Diane Low, of Missouri are accomplished chefs who specialize in cast iron cooking over wood coals. Jim wrote, “The morels and wild turkey with bow-tie pasta and nut-crusted venison loin best fit the hunting/foraging description.” He shared several of his favorite recipes:
Wild Rabbit & Bowtie Pasta in Chardonelle Cream Sauce
Here’s the recipe, as best I can reconstruct it. It was a work in progress the first time, and I honestly don’t remember exactly what I did. Furthermore, the following includes things I will do differently next time – such as adding the mushrooms. Take this as a starting point for your own creativity.
INGREDIENTS
Back straps from 2 large or 3 small rabbits, cut in 1” cubes. Substitute chicken breast if necessary.
olive oil
12 oz. of Bill Powell’s Chardonelle
12 oz. of chicken stock
4 medium shallots, finely chopped
4 bay leaves
2 teaspoons of cracked peppercorns
12 sprigs of fresh thyme, chopped
8 oz. half and half or heavy cream
1 large green bell pepper and 1 large red bell pepper sliced into thin strips about 2 inches long
8 oz of fresh mushrooms, sliced ¼ inch thick
1 stick of cold butter, diced
Fresh lemon juice
Salt to taste
PREPARATION
Sear the meat. Put it in a bowl and keep warm in the oven.
Add a little olive oil to the skillet and sauté the shallots on low heat until they begin to soften. Add the stock and increase the heat to medium. Use a spatula or wooden spoon to scrape up the browned meat juices from the bottom of the skillet and dissolve them in the stock. Add the seasonings and continue simmering until the liquid is reduced by 2/3. Add the cream and reduce the resulting mixture by half.
Remove the sauce from heat and strain into another container, then return the sauce to the skillet and whisk in the butter. Season to taste with salt, lemon juice and additional pepper, if needed. Stir in the browned rabbit chunks and keep warm.
Cook pasta. I recommend bowtie, ‘cause it’s cute. While it is cooking, sauté the bell pepper strips and mushrooms in butter until soft on the outside, but still firm. Place pasta in a large serving bowl and arrange the bell pepper strips on top. Pour sauce and rabbit meat over the top. I don’t know how much pasta you should cook. I cooked too much, then discarded what I thought was too much for the sauce.
CHICKEN & DUMPLINGS
1 pound of chicken breast, cut into 1-inch chunks
2 Tablespoons margarine or butter
1 cup diced potatoes
12 ounces of mixed vegetables (thawed)
2 Tablespoons crumbled bacon
small can mushrooms, drained
2 teaspoons parsley flakes
1 can cream of chicken soup
4 ounces evaporated milk
½ teaspoon paprika
½ teaspoon sage
2 cups Bisquick
4 ounces evaporated milk
½ cup water
2 Tablespoons water
1 egg, beaten
Melt 2 Tablespoons of butter in a 12-inch DO on low heat (7 briquettes under oven). Sauté chicken until cooked through. Add potatoes and cook another 3 minutes. Add veggies, bacon, mushrooms,, parsley soup, 4 ounces of milk and spices. Cook on medium heat (12 briquettes under oven) with lid on. While heating, cut remaining butter into Bisquick in a mixing bowl. Stir in milk, water and eggs in a mixing bowl. When chicken mixture bubbles, drop tablespoon-sized dollops of Bisquick mixture on top of broth. Bake 25 minutes at 350 degrees (8 briquettes under oven, 16 on top)
ZUCCHINI BAKE
3 cups grated zucchini
1 ¼ cups uncooked oatmeal
1 cup grated mozzarella
1 Tablespoon dried, minced onion
1-3 teaspoons dried, minced garlic
1 egg, beaten
1 teaspoon dried basil
½ teaspoon salt
¼ teaspoon black pepper
½ cup tomato sauce
Mix all ingredients except tomato sauce in order listed. Pour into a 10-inch Dutch oven and top with tomato sauce. Bake 30 minutes at 350 degrees.
PULL-APART BACON BREAD
2 3-ounce cans of cooked bacon pieces or 24 ounces of bacon, fried and crumbled
1 Tablespoon of cooking oil or bacon grease
½ cup chopped green pepper
½ cup chopped red pepper
1 cup chopped onion
4 tubes of buttermilk bisquits (30 ounces)
¾ stick melted butter or margarine
2 cups (8 oz) grated cheddar cheese
Preheat a 12-inch Dutch oven to 350 degrees. Place a small tin can in the center. Saute vegetables in oil. Cut biscuits into quarters and place in a large mixing bowl. Add sautéed vegetables, bacon, butter and cheese. Toss until well mixed and arrange around the tin can. Bake at 350 degrees for 30 to 40 minutes. Invert into a serving pan as soon as cooked and serve immediately.
BASIL, BELL PEPPER AND JACK CHEESE CORNBREAD
1 cup chopped onion ½ cup chopped fresh basil
1 ¾ cups cornmeal 3 eggs
1 ¼ cups flour ¼ cup sugar
2 ounces diced red bell pepper 1 Tablespoon baking powder
1 ½ cups grated pepper jack cheese ½ teaspoon baking soda
1 1/3 cups canned or frozen corn, drained 1 ½ teaspoon salt
½ cup unsalted butter, chilled and cubed 1 1/2 cups buttermilk
Melt 1 tablespoon of butter and sauté onions until tender. Set aside to cool. Mix cornmeal, flour, baking powder, baking soda, salt and sugar in a large bowl. Add 7 Tablespoons of butter and rub into the flour/meal mixture with your fingers until it resembles coarse meal. Whisk milk and eggs together in a small bowl. Add milk mixture to dry ingredients and stir until blended. Fold in cheese, corn, peppers, basil and onion. Transfer to Dutch oven and bake 45 minutes at 400 degrees.
ROAST CHICKEN AND CARROTS
3-4 lb. roasting chicken 2 bay leaves
2 Tablespoons unsalted butter 2 springs of fresh thyme
2 tablespoons olive oil 1 cup chicken stock or bullion
2 cups diced yellow onions ½ cup dry white wine
6 garlic cloves, peeled and minced 3 cups stewed tomatoes (28-ounce can)
3 ½ cups diced celery Kosher salt and freshly ground black pepper to taste
4 cups carrots, peeled and sliced 2 Tablespoons fresh parsley
Put butter, oil, onions, garlic and celery in oven and saute over medium heat until softened. Add the carrots, bay leaves and thyme and cook another 5 minutes. Add chicken, stock, wine and tomatoes and season with salt and pepper.
Cover the oven and cook at 300 degrees for 1 ½ hours or until legs are loose and meat is falling off the bone. Replenish coals every 30 minutes and turn oven and lid every 15 minutes. Remove bay leaves and thyme spring before serving.
To make dumplings, add 2 cups of chicken stock when chicken is cooked and bring to a slow boil. Add dumpling dough per instructions on Bisquick box.
LEMON PEPPER CHICKEN SUPREME
4 chicken breasts
12 ounces of Lawrey’s Lemon Pepper Marinade
16 fresh asparagus spears
1 cup crab meat
4 medium mushrooms, sliced
1 small onion, sliced
6 tablespoons grated parmesan or romano cheese
4 slices of bacon
1 Tablespoon sesame seeds
2 sandwich-sized slices of swiss cheese
1 medium avocado
1 Roma tomato
2 tablespoons sliced almonds
lemon pepper seasoning
Butterfly each chicken breast, leaving halves attached. Marinate in half the marinade for at least 30 minutes. Remove breasts and lay them flat. Discard used marinade. Sprinkle each breast with lemon pepper . Place four asparagus spears on half of each breast. Evenly distribute mushroom, onion slices and romano cheese on top of asparagus. Fold other half of breasts over to form a sandwich. Wrap each breast in a bacon slice and secure with a toothpick. Put the breasts in a 12-inch Dutch oven and pour half the remaining unused marinade over the chicken. Sprinkle sesame seeds and almond slices over breasts. Cook at 350 degrees for 45 minutes. While chicken is cooking, cut cheese slices diagonally to form triangles. Peel avocado and cut into slices ¼ inch thick. Slice tomato into thin round slices. When chicken is done, place on serving platter and arrange cheese triangles in alternating layers to produce a chevron pattern. Garnish with avocado and tomato slices and drizzle some of the remaining marinade over the chicken.
ASIAGO BRIOCHE (Relax, it’s just butter bread.)
1 package dry yeast (2 ½ teaspoons
¼ cup warm water
½ cup milk
½ cup butter (1 stick) at room temperature
2 Tablespoons sugar
½ teaspoon salt
3 eggs
1 egg yolk
3 ¼ cups all-purpose flour
1 cup grated or crumbled asiago cheese (Rromano or parmesan cheese are okay, too)
Egg glaze – one egg white beaten with 2 tablespoons milk
Sprinkle yeast into warm water and stir until dissolved. Heat milk until very warm. Beat butter until creamy. Add sugar, salt, whole eggs and egg yolk. Beat well. Add milk and yeast mixture. Add flour and cheese a little at a time and beating sell after each between additions. Turn dough out onto a lightly floured board. Knead until smooth and satiny. Place in a greased bowl and butter top lightly. Cover with a clean dish towel and set to rise in a warm place until double in size. Turn out on a lightly floured board. Roll into a 12-inch log and cut into thirds. Roll each third into an rope 1 ½ inches thick.. Lay ropes side-by-side on a lightly floured board, Pinch together at one end and braid tightly. Using a large metal spatula, lift the braid and curve it around the inside of a well-oiled 12-inch (regular, not deep) Dutch oven. Spread egg white glaze over top with a pastry brush. Cover and return to warm place to rise until double in size. Bake at 375 degrees 30-35 minutes, until the loaf sounds hollow when thumped. Serve warm.
PAPRIKA VENISON (OR BEEF) STEW
Ingredients
2 ½ – 3 cups of stew meat, cut into half-inch cubes
½ cup flour
3 Tablespoons of paprika
Salt & pepper to taste
3Tablespoons of butter
2 medium onions, diced
2 cloves of garlic, minced or crushed
1 teaspoon of marjoram
11 ounces canned diced tomatoes
½ cup cup (4 oz.) sour cream
½ cup red wine
Equipmment
Gallon-size resealable plastic bag
10-inch Dutch oven (for single recipe)
10-inch deep Dutch oven for cooking noodles
Medium large bowl to hold cooked meat
Place flour, salt and pepper in plastic bag. Add cubed meat and shake to coat meat completely. Melt 1 Tablespoon of butter in a 400-degree oven. (7 for a 350-degree oven, plus 4 for an additional 50 degrees, or a total of 13 for a 12-inch) Add half the meat and fry until golden brown. Repeat with the rest of the butter and meat.
Melt remaining Tablespoon of butter and sauté garlic and onions until transparent. Add meat, paprika, tomatoes, marjoram and wine. Simmer over low heat 45-90 minutes. Cook egg noodles so they are done when stew is finished. Just before serving, add sour cream and stir into sauce.
DIANE & JIM’S VENISON STEW
Stew
¼ cup shortening
¼ cup all-purpose flour
1 ½ teaspoon salt
10 ounce can beef broth
5 cups water
3 Tablespoons fresh lemon juice
1 medium onion, sliced
6 large carrots, quartered
4 stalks celery, quartered
8 ounces fresh mushrooms, sliced thick
2 cans green peas, drained
2 cloves garlic, crushed or minced
2 whole cloves
1 bay leaf
3 pounds venison, cut into 1- to 1 1/2 –inch cubes.
½ cup dry red wine
2 tablespoons flour
Dumplings
4 slices white bread
2 pounds potatoes coarsely grated
1 teaspoon salt
1 Tablespoon of onion, grated
1 Tablespoon of dry parsley flakes
2 eggs, well beaten
all-purpose flour
Melt shortening in a 12-inch deep or 14-inch Dutch oven over low heat (5 briquettes). Add flour and cook until caramel covered, stirring constantly. Add salt and next 11 ingredients. Boil 5 minutes (20-30 briquettes under oven, lid on. Add venison, cover and reduce heat until the broth barely simmers (5-8 briquettes under oven). Cover and cook 2 hours.
Remove crust from bread and discard. Drain all water from potatoes. Tear bread into 1-inch pieces. Combine bread, potatoes, salt, onion, parsley and eggs. Roll mixture into 16 balls and roll lightly in flour. In a small bowl, mix wine and flour until no lumps remain.
Stir wine & flour mixture into broth. Place dumplings on top of broth and simmer until dumplings are cooked through, 10-20 minutes (7-10 briquettes under oven, 10-20 on top.)
BREAD PUDDING
4 eggs
8 slices white bread
2 cups canned apples or applesauce
2 cups milk
1 to 2 sticks butter or margarine
2 cups brown sugar
2 cups raisins, softened in hot water
cinnamon
Beat eggs and milk together and set aside. If using apples, mash with a fork to chunky consistency. Drain raisins.
Line a 10-inch Dutch oven with heavy-duty aluminum foil, shiny side toward food. Make sure the foil stops just below the top of oven wall, allowing lid to seal properly.
Butter four slices of bread on one side, cut each diagonally and lay in a single layer to cover bottom of oven, butter side down. Spread half the apples over the bread layer. Sprinkle generously with cinnamon. Sprinkle half the sugar and all the raisins over the apples. Butter, cut and layer remaining bread, butter side down. Spread the rest of the apples and sugar over the top and sprinkle generously with cinnamon. Pour egg and milk mixture slowly over all, taking care not to let it run between foil and oven wall. Cover and refrigerate for 30 minutes to allow liquid to soak in.
Bake at 350 degrees (7 briquettes under, 13 on top) for 45 minutes. Remove lid and allow to cool before serving. Great plain, with ice cream or whipped cream.
NUT-CRUSTED VENISON OR BEEF LOIN
Grind 1 cup of pecans in a blender, food processor or meat
grinder. Mix the nuts with 1/2 cup of Italian flavored bread crumbs,
2 tablespoons of chopped fresh or dried parsley, 2 teaspoons of pepper and 2 teaspoons of salt. Add enough cooking oil to give the mixture a pasty consistency.
Put a 2-pound roast in a greased Dutch oven. Coat the roast with
the nut mixture. Cover and cook 30 to 45 minutes with about half of the oven lid covered with coals and a little less heat on the bottom. Serve when the meat is still pink in the middle.
Charcoal briquettes provide even, longest-lasting heat. If cooking in an oven, bake the roast at 350 degrees in an uncovered baking pan.
PINEAPPLE UPSIDE DOWN CAKE
¼ cup butter
½ cup brown sugar
¾ cup walnuts or pecans
1 can sliced pineapple
1 regular yellow cake mix
Eggs, water and other ingredients called for on cake mix box
Melt butter in a 12-inch Dutch oven. Remove from heat and mix in sugar. Arrange pineapple rings on top of butter-sugar mixture and place a cherry in the center of each. Sprinkle nuts on top of pineapple rings. In a separate bowl, prepare cake mix per package directions and pour into the Dutch oven. Bake at 350 degrees for 30-40 minutes. Remove from coals, uncover and let cool 10 minutes. Place a cutting board, foil-covered cardboard or a large plate over the top of the oven and flip. Oooh, ahh, and eat.
BAKED APPLES
12 small, tart apples
½ cup brown sugar
½ cup pecans or walnuts
½ cup raisins
¾ tsp nutmeg
1 tsp cinnamon
1 stick of butter
¼ cup water
Core the apples, leaving the bottom intact if possible. Arrange the apples in a 12-inch Dutch oven. Pour water into bottom of oven. Combine the other ingredients, and spoon the mixture into the hollow apples. Dot with butter and bake at 350 degrees for 30 minutes. Open oven and baste apples with pot liquor. Bake another 10 minutes or so, just enough to soften apples through. Best with vanilla ice cream.