A Kansas Couple Creatively Walk The Path
by Emily and Zach Hemmerling, guest bloggers
Anyone who has ever spent hours picking green beans knows it’s a thankless job. Aching backs, mosquito bites, and soaked sweatbands, all for a few pounds of produce that is consumed almost embarrassingly fast. Last spring, I made a resolution. If I was going to toil under the summer sun in that special brand of syrupy humidity unique to south-central Kansas, then I was going to make it look good.
String Bean Labyrinth
I decided I wanted a green bean labyrinth. My indulgent husband got quite a kick out of the idea, and planted the seeds in the sketched-out shape I left for him on the kitchen counter one morning. It’s a simple labyrinth, just a few turns, and the lines are three plants thick. We planted three different varieties: Jade, Royalty Purple Pod, and Dragon’s Tongue.
Connecting
Two great flushes of beans gave us about twelve pounds before a sudden heat wave crumpled all but the inner circle. It was still a job to “go pickin’,” but the labyrinth made it easier. And, it was always nice to suddenly find myself in the middle, and even nicer to see I’d already filled my basket without realizing it. Sometimes when my husband got home from his landscaping work we would walk the labyrinth. We’d talk about our days or plan a camping trip, or dream about what the orchard will look like in a few years. Those few minutes to reconnect before moving on to our respective evening chores would keep us going. Then the pig-weed moved in, and by that time the grapes were turning, leaving the labyrinth to slowly dissolve back into the ground. The field where the green bean labyrinth was is already planted to red clover and will be fallowed next year. Since the next plot in rotation is a bit too narrow to hold a proper labyrinth, it might be a few years before the next vegetable labyrinth takes shape. It’s worth the wait.
Editor note: Below is a You Tube video about drawing three and five circuit labyrinths. Lars Howlett is a skilled builder and facilitator connected with The Labyrinth Society.
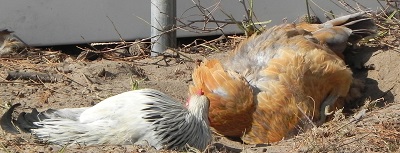
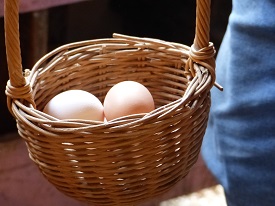
One late October afternoon Rich brought only three eggs into the kitchen. In spring and summer our 15 hens normally give us a dozen beautiful eggs every day. Like so many signs in nature our chickens are telling us it is transition time.
We have lucky chickens. They enjoy good food, safe living space, and daily fresh air, sunshine, exercise and natural food. Seasons shape their lives, but even their unfortunate counterparts living in cramped cages in factory farms are not completely immune to seasonal changes of nature.
When molting chickens lounge, take dust baths, and re-grow new feathers.
A hen starts laying when she’s four to five months old and stays laving for 12 to 14 months. Egg laying is tough on bodies and after a year chickens need a vacation. So hens call time out. They shed old worn out feathers and grow new ones, rest and eat as they build back strength. After a month or two they look great in their new feathers and begin laying again – if they are fortunate enough to live in a backyard flock.
Commercial egg operations kill hens as they begin to molt and replace them with young birds. Not us. We keep our birds for at least two years. In their second lay cycle our hens give us slightly fewer eggs but they are huge with bright yellow/orange yolks in shells of various hues.
Molting is caused, in part, by the age of the bird, but declining daylight is a major factor. Nature has programmed chickens to lay the most eggs in spring. As fall’s days shorten production drops. We let our chickens enjoy seasonality. Commercial eggeries don’t. Their unfortunate hens live in windowless buildings with lighting that simulates spring to stimulate peak production.
Declining day length triggers thousands of reactions in our world outside the living room windows. Here are just a few things we notice:
A still day of reflection on Turtle Stump.
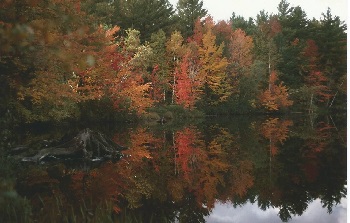
Leaves of our sugar maples turn vibrant red/orange before drifting to the ground like snow. Our black, white, and red oak leaves wait a bit later until turning rust colored and shedding, although some oaks keep dead leaves all winter.
White footed mice, box elder bugs, and Asian beetles try their best to get into the house before cold weather settles in.
There are comings and goings in the yard. We’ve said “goodbye” to house wrens, orioles, grosbeaks, warblers and many other birds but are delighted to welcome back juncos from their nesting grounds up north. Hawks, geese, and even pelicans pass overhead on their way south.
The world sounds and looks different as humid summer air transitions into fall’s dryness. Colors are more vibrant in low humidity air, sound transmits more clearly, and late afternoon sunlight dances across tree trunks and drying prairie grasses.
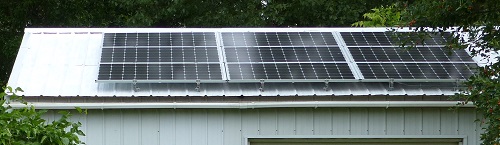
Sunlight hits our solar panels at a different angle in the fall and winter.
We produce a bit less electricity from our photovoltaics because the sun isn’t shining as long each day, but peak production is earlier in the day than in midsummer
Sitting outside on a bright autumn day lets us soak in the sun’s delicious warmth but it cools quickly as the sun drops. Then, we go inside to enjoy the warmth our wood stove provides.
Clouds drift by and sunrises and sunsets are particularly colorful.
Autumn and winter constellations enchant viewers and linger into the darker mornings. Because the temperatures are mild, star gazing is pleasant.
Fall is a beauty filled season. We encourage you to “Go outside and play!”
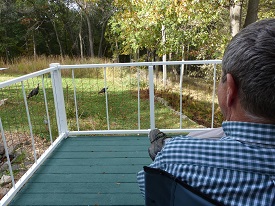
When we bought Winding Pathways six years ago we ended up with two old wooden decks and steel deck furniture.
Turkeys in yard
We love our decks and often enjoy meals there. Sometimes we just sit on our decks watching wildlife in the prairie and woodland. Unfortunately, our decks and furniture were showing their age.
They were made of pressure treated wood. Years of Iowa weather had created many cracks, and in some places the boards were uneven. So we decided to refurbish them.
Decks are challenging surfaces. Sun bakes them, while rain and snow add moisture. Changes in temperature and moisture cause wood planks to swell and shrink.
Staining big deck
Options for upgrading a deck or treating a new one include:
Leaving the wood bare: This works. There’s no paint to peel. Maintenance includes tightening screws that work loose and occasionally washing the wood. Expect some cracking and discoloration.
Staining: Stains penetrate wood and resist peeling. Most stains come in a variety of colors and provide some protection to the wood.
Painting: Unlike stain, paint stays on the wood’s surface rather than penetrating. Regular exterior paint doesn’t usually last long as swelling and shrinking wood forces it loose. Special deck paint formulations are made by a variety of companies and are durable.
Replacing with plastic wood. Fake wood sounds silly but many companies make deck material from recycled plastic. It does not absorb water so swelling and shrinkage is minimal. Color is within the plastic. Some types fade, while others don’t. Maintenance is minimal. They are very long lasting but cost is normally much higher than wood.
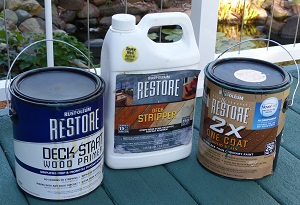
Materials for restore the deck.
To fix our deck we bought a Rustoleum product called RESTORE 10X. It is an extremely thick paint designed to fill cracks and low spots. When we applied it in the fall of 2014 it looked great. Then came a tough winter followed by a rainy spring. The new paint peeled in sheets, and we were frustrated.
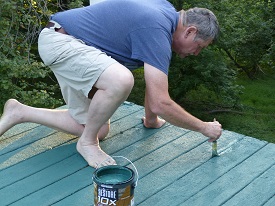
Priming the deck
Painting small deck
Rustoleum guaranteed the product and replaced it with newly reformulated paint and primer. We applied it in late summer 2015. A year later it looks as good as new. The combination of the new formulation over a special primer seems to have solved peeling problems.
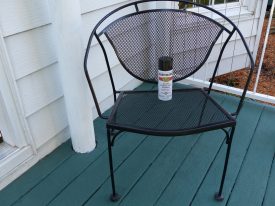
Furniture proved much easier to spiff up. The original finish had gotten dull and some rust spots were appearing. We washed and scrubbed the surfaces and applied black Rustoleum spray paint. That did the trick with minimal effort!
Now both our deck surfaces and furniture look good as new.
Our review is an independent, unsolicited, unpaid blog.
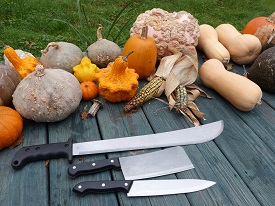
Winter Squash vary in color, texture, shape and size.
One of the most exciting times of our gardening year is winter squash harvest. Few plants are as interesting or useful. They’re diverse, easy to grow, colorful, easy to store, delicious, and can be used in dozens of recipes.
Winter squash were domesticated by Native Americans long before Columbus and with beans and corn provided a balanced diet. Although there are several species of squash all share similar characteristics. It’s hard to believe that common jack-o-lantern pumpkins are the same species as delicate acorn squash – but they are. Squash range in size from tiny acorns to massive 2,000 pound pumpkins. They also vary greatly in shape and color.
Squash are categorized as either summer or winter. Summer squash, such as zucchini or crookneck, are eaten during summer when the fruits are small and tender. They don’t keep long. Winter squash, in contrast, are allowed to mature until they are full grown and hard. They keep for months.
Here’s why we like winter squash at Winding Pathways:
They’re easy to grow. Plant seeds in rich soil after the danger of frost has past, keep the weeds down until the squash plants are about a foot tall, and then just let them grow. They will out compete weeds as their vines create a solid mass of leaves.
They’re easy to harvest. We wait until the vines die back in September and then clip off the stems with a pruning shear. We load them up in the wheelbarrow and spread them on the back deck where they continue to cure in the sunshine.
They’re easy to store. No canning, freezing, or drying is needed. We simply bring the squash inside before the first frost and store them in a dry cool location. Several types last for months and we’re still eating them in March.
They’re a delicious, versatile, and nutritious food. Squash is loaded with vitamins, omega 3 fatty acid, and minerals.
They’re just plain fun. Squash even make interesting table decorations.
Winding Pathways Squash Growing Tip
Every year we plant many varieties of winter squash and pie pumpkins. We can never predict which types will grow best in a given year. In some years we get a heavy crop of one type while others barely produce a fruit. Diversity assures a good crop. Many garden stores only sell a few varieties, but we hedge our bets and order seeds of many varieties. Our favorites are Butternut, Hubbard, Silver Bell, and Sweet Potato. A wonderful source is Seed Savers Exchange. Some varieties grow to massive size, but with only two of us at Winding Pathways we stick with varieties that produce smaller squash fruits. Fortunately, plant breeders have created a downsized version of the traditional Hubbard squash and several other types.
Cooking Winter Squash
Every cookbook has winter squash recipes and Epicurious offers more online. We usually keep it simple and use our squash as a side dish with melted butter. Here are some squash cooking tips:
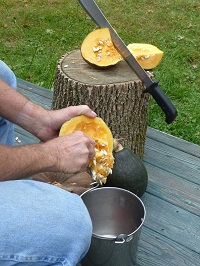
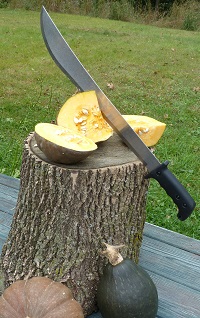
Opening a tough skinned squash: The tough thick skin covering a winter squash keeps it fresh for months but can be intimidating to cut. A heavy bladed sharp knife works but we have fun and put the squash on a chopping block outside and whack it with a machete! Works great. Our cousin, Marie Zieger, avoids cutting through tough skin by simply baking the whole squash. That softens it and makes it easy to slice it open. Another way of opening a big squash is to simply drop it on concrete to crack it and then pry it apart.
Cooking the squash: We place chunks in a pan and baking at about 350 degrees for about an hour or until the flesh is soft. Using a microwave is faster and works fine. Sometimes we put chunks in a pressure cooker for about 15 minutes. The pressure cooker method results in moister cooked squash flesh. Occasionally we’ll cut the raw squash into chunks and add them to winter stews. Extra cooked squash can be put in sealed containers and frozen.
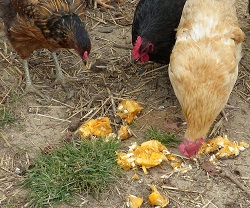
We recycle the seeds to the chickens.
Seeds and the tough skin: We scoop out the seeds and feed them to our chickens. Some people remove the cords that hold the seeds together, wash the seeds lightly, apply a seasoning, and roast them for a delicious high protein snack. Tough skins go into the compost bin.
We love winter squash. Few plants are as easy to grow and delicious.
A machete is useful in cutting squash.
Chickens efficiently recycle squash seeds to eggs.
A variety of fencing keeps deer and rabbits out of the garden.
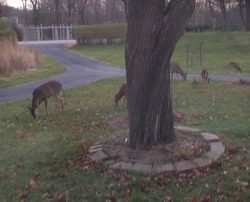
Like millions of American homeowners we at Winding Pathways have a love/hate relationship with deer. Few animals are as beautiful as a peaceful doe nursing her fawns or as majestic as a powerful buck sporting husky fall antlers. But a love of deer only goes so far. Anger mounts quickly when they devour flowers and vegetables, girdle valuable trees, or dart in front of the car on a dark night. Last year we planted a small river birch that was growing well until a buck utterly destroyed it while rubbing his antlers on it. Frustrating!
Until about 25 years ago deer mostly lived in large forests and rarely ventured into town or suburbia, but as their rural population grew they moved right into town. Most suburbs have plenty of wooded pockets where deer can hide and nutritious forage in parks, gardens, and yards. Today deer are amazingly abundant in suburbia, where they prance up and down streets and dine on valued vegetation.
DEER DAMAGE
Deer generally do two types of vegetation damage. One’s relatively easy to prevent, while the other is more challenging.
RUBS: Antlers form during warm months as a blood rich skin, called velvet, nourishes fast growing bone like antlers that are mostly calcium. By September, antlers have reached full growth. Velvet dies and dries, and bucks remove it by rubbing antlers against small trees. They prefer saplings a few inches in diameter. Rubbing often girdles and kills the tree, and deer always seem to attack the most valuable tree in the yard. It’s infuriating and costly. Although velvet is mostly gone by early October deer continue to bang and rub their antlers against trees throughout the fall.
The Cure: Fortunately there’s an easy way to prevent rubbing.
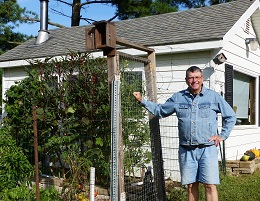
At Winding Pathways we use heavy wire in 2” X 4” mesh that we buy in 50 foot rolls. It’s relatively easy to cut an eight foot length of fencing using wire cutting pliers. Once we have the section cut we ring it around the tree and hold the ends closed with cable ties. Usually one metal fence post driven 18” into the ground will hold the wire in place. Sometimes two posts placed on opposite sides of the tree are needed. We attach the wire mesh to the post using big cable ties. The wire stays in place year round until the tree is at least 4 inches in diameter and no longer threatened by rubbing.
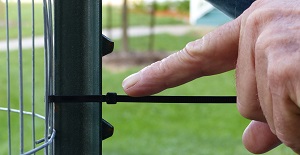
Attache zip ties firmly to a post.
What You Need to Make a Wire Ring
Wire: We buy rolls of 2”X4” four foot tall galvanized wire mesh from a farm or building supply store. Many brands and types of wire mesh are for sale but we prefer Red Brand. It is stiff and strong and we usually only need one fence post to hold it up. Red Brand fencing is made in the US. Less sturdy wire mesh is cheaper but bends easily, rusts more quickly, and usually requires a few fence posts to hold it in place.
Pliers: We unroll about eight feet of the wire roll on the driveway for cutting. Any type of cutting pliers will work to cut off a section but we find “Bernard” pliers perfect for the task. These are usually made for anglers and have a wire cutter and spring that automatically opens the pliers after a cut. They make slicing off a section easy and fast.
Fence Post: With stiff wire mesh one fence post will hold a ring of wire in place around a tree. Wire mesh that readily bends may need two or three posts. We buy 6 foot posts, called T posts, at farm or building supply stores and pound them 18 inches into the ground 12” to 20” out from the tree’s trunk. A small sledge hammer makes a handy pounding tool. We then form a circle of the wire panel around the tree and fasten the ends together.
Cable ties, sometimes called nylon zip ties, make joining the ends of the wire mesh and attaching the wire to the fence post easy. The ties come in various sizes. It takes big ones to run through the wire mesh and secure around the post. Twist wire also works to hold the ends together or attach the wire mesh to the post.
Putting a ring of wire around valuable young trees is almost certain to protect them from rubbing and browsing. Just be sure to do it before damage starts.
At Winding Pathways deer come into the yard. We protect young trees with fencing as seen in the back to the right.
LUNCH AND DINNER WITH BREAKFAST TOSSED IN: Deer love eating many landscape and vegetable plants. Although they have preferences, the hungrier the deer, the more likely they are to even eat plants they generally dislike. Garden books often list species of plants that deer do and don’t like to eat but beware, like humans, individual deer have food preferences. Although most deer may not like a particular plant species, others may consider it a dining delight. Deer seem to have regional tastes, so the plants they don’t like in Connecticut may be gourmet fare in Alabama or Iowa. Unfortunately, many plants that deer relish are the same ones homeowners like to plant, so protecting them is vital to success.
Damage to trees by rubbing is seasonal and normally only happens in the fall. In contrast browsing damage happens all year with deer generally eating softer vegetation during warm months and twigs during winter.
The Cure: Preventing deer from eating valued vegetation is difficult but here are some ways to either eliminate or stop it:
Fences
No doubt about it. A sturdy fence keeps deer away from plants and prevents damage. Fencing has downsides. It’s expensive, often unsightly, and it requires maintenance. A fence can ring an entire property or just an area that needs protection, such as around the vegetable garden. Generally there are two types of fence used to prevent browsing.
Electric fences work well. Many newer ones are moveable and easy to install. Electric fences don’t need to be very tall. They are relatively expensive but their biggest disadvantage is that they sometimes give a shock to a careless homeowner or even a child. Many towns ban electric fences, so be sure one is legal before you buy one. We like fences made by Premier.
Nonelectric fences work well to exclude deer but also have disadvantages. They are laborious to install and are relatively expensive. They can be made of heavy duty nylon or wire mesh. Deer are amazing high jumpers and can clear a six foot fence, so a deer proof fence should be eight feet tall!
Repellents
A good fence will prevent deer damage by keeping hungry animals away from desirable plants. Repellents are less certain but can help reduce damage. Repellents are most helpful when temporary protection is needed or where fences won’t work and they are less expensive. They have these disadvantages:
Need to be reapplied often and always after a rain.
Sometimes smell strongly.
May not be suitable for use on vegetables.
Only somewhat deter deer from snacking.
Our good friends Dave and Sue Kramer own Kramer’s Flower Farm and produce thousands of varied colored day lilies every year. Visit their farm in mid-summer and it is a sea of blooms. People love looking at colorful flowers but deer consider them lunch. Kramer’s farm is surrounded by woods, so they have to be vigilant in keeping deer way from their crop. Dave uses a home-made spray that keep deer at bay.
Kramer’s Deer Repellent Recipe
Ingredients:
One gallon of water.
Three egg yolks
One teaspoon garlic powder.
One teaspoon cayenne pepper finely ground
Directions:
Add ingredients and shake well. Leave in the sun for a couple of days. Shake again and filter through an old nylon stocking to remove lumps or they will clog the sprayer. Put in a standard sprayer and spray plants. Treatment needs to be repeated often and after every rain.
Deer don’t like the smell or taste of rotten eggs. Who would? Anyone who would rather not make their own egg based spray can buy commercial mixes. The one we use is called Deer Stopper and is made by the Messinas Company. The label says it’s made of putrescent whole egg solids, rosemary oil, mint oil and several inert ingredients.
After buying several inexpensive sprayers that clogged we bought a Stihl brand sprayer that works well and seems less likely to clog.
Whether using a home-made or commercial repellent remember it needs to be reapplied relatively often and always after a rain.
Direct Action
Winding Pathways is near Cedar Rapids, Iowa. Several years ago the City Council approved allowing citizens to hunt deer using archery equipment. Hunters need to prove proficiency with their equipment and special rules are in place to ensure safety. Each year hunters convert several hundred suburban and urban deer into chops and steaks. Deer meat is “free ranging, local, organic” and delicious.
Each year we harvest a deer from our property. This doesn’t stop deer damage but does provide us with food, and if enough people each take a deer, their population density and, thus, damage will decline. So, if it’s legal in your area, consider converting a deer to food. Normally a state and sometimes a local permit is needed. Look for a future Winding Pathways blog on how to harvest and dress a deer.
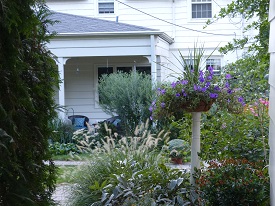
This intriguing winding path beckons visitors into the backyard.
A short winding pathway around the home of Scott and Jan Overland leads to a wondrous backyard that’s an oasis of privacy and peace within bustling Cedar Rapids, Iowa. Butterflies flitted about as a hummingbird sipped nectar from an obedient plant as we toured the yard.
“When we first moved here the landscaping was traditional and sparse, and at first we tried to maintain it that way. But then we changed course and began adding interesting plants that make our yard beautiful. It’s a fun project,” said Scott Overland, who is a professional financial adviser and member of the Cedar Rapids City Council.
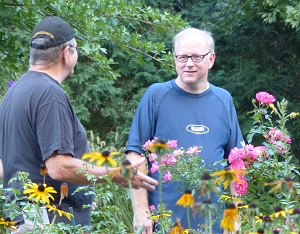
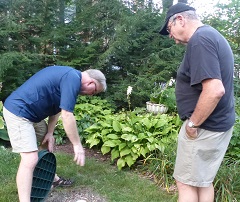
Rich and Scott share backyard delights
A special aspect of the Overland’s yard is how it has engaged them in nature and the environment. “We visit nurseries to learn about plants and sometimes add new ones. It’s a wonderful learning experience.” he said. A barred owl occasionally serenades them from a hemlock tree near the house bringing sounds of the deep woods to their neighborhood.
Scott shows the French drain, named for its inventor, Henry French, from Massachusetts in the mid 1800s.
There’s more. The diverse and beautiful yard absorbs storm water better than if it were traditionally landscaped. “Nowadays storms have more intensity than they once did and our yard absorbs most of the rain that falls on it. We installed a French drain to further help water enter the soil and avoid flowing into storm sewers that would add to downstream flooding,” he said.
Glimpses of comfort and color welcome visitors.
The Overlands demonstrate that a yard needn’t be big to be beautiful and ecologically healthy. They’ve created a magical space on a quarter acre lot not far from downtown.